Column Validation
Data validation is essential for maintaining data quality in your sheets. Sheety App allows you to set validation rules on columns to ensure that users enter valid data. When a validation rule fails, users will see a clear error message explaining what’s required.
What You’ll Learn
Section titled “What You’ll Learn”- How to add validation rules to columns
- Understanding different validation types
- Setting up minimum value validation for numbers
- Creating custom error messages
- Managing multiple validation rules
Prerequisites
Section titled “Prerequisites”- A workbook with at least one sheet (complete Creating Your First Workbook if you haven’t already)
- Basic understanding of Adding Columns
Understanding Column Validation
Section titled “Understanding Column Validation”Column validation rules help you:
- Enforce data requirements - Make fields required or optional
- Set value constraints - Define minimum/maximum values for numbers
- Ensure data quality - Prevent invalid data entry before it’s saved
- Guide users - Provide clear feedback with custom error messages
- Maintain consistency - Apply same rules across all data entries
Example: Adding a Base Salary Column with Validation
Section titled “Example: Adding a Base Salary Column with Validation”Let’s create a practical example: adding a “Base Salary” column that must be greater than zero. This ensures no employee can have a negative or zero salary entered.
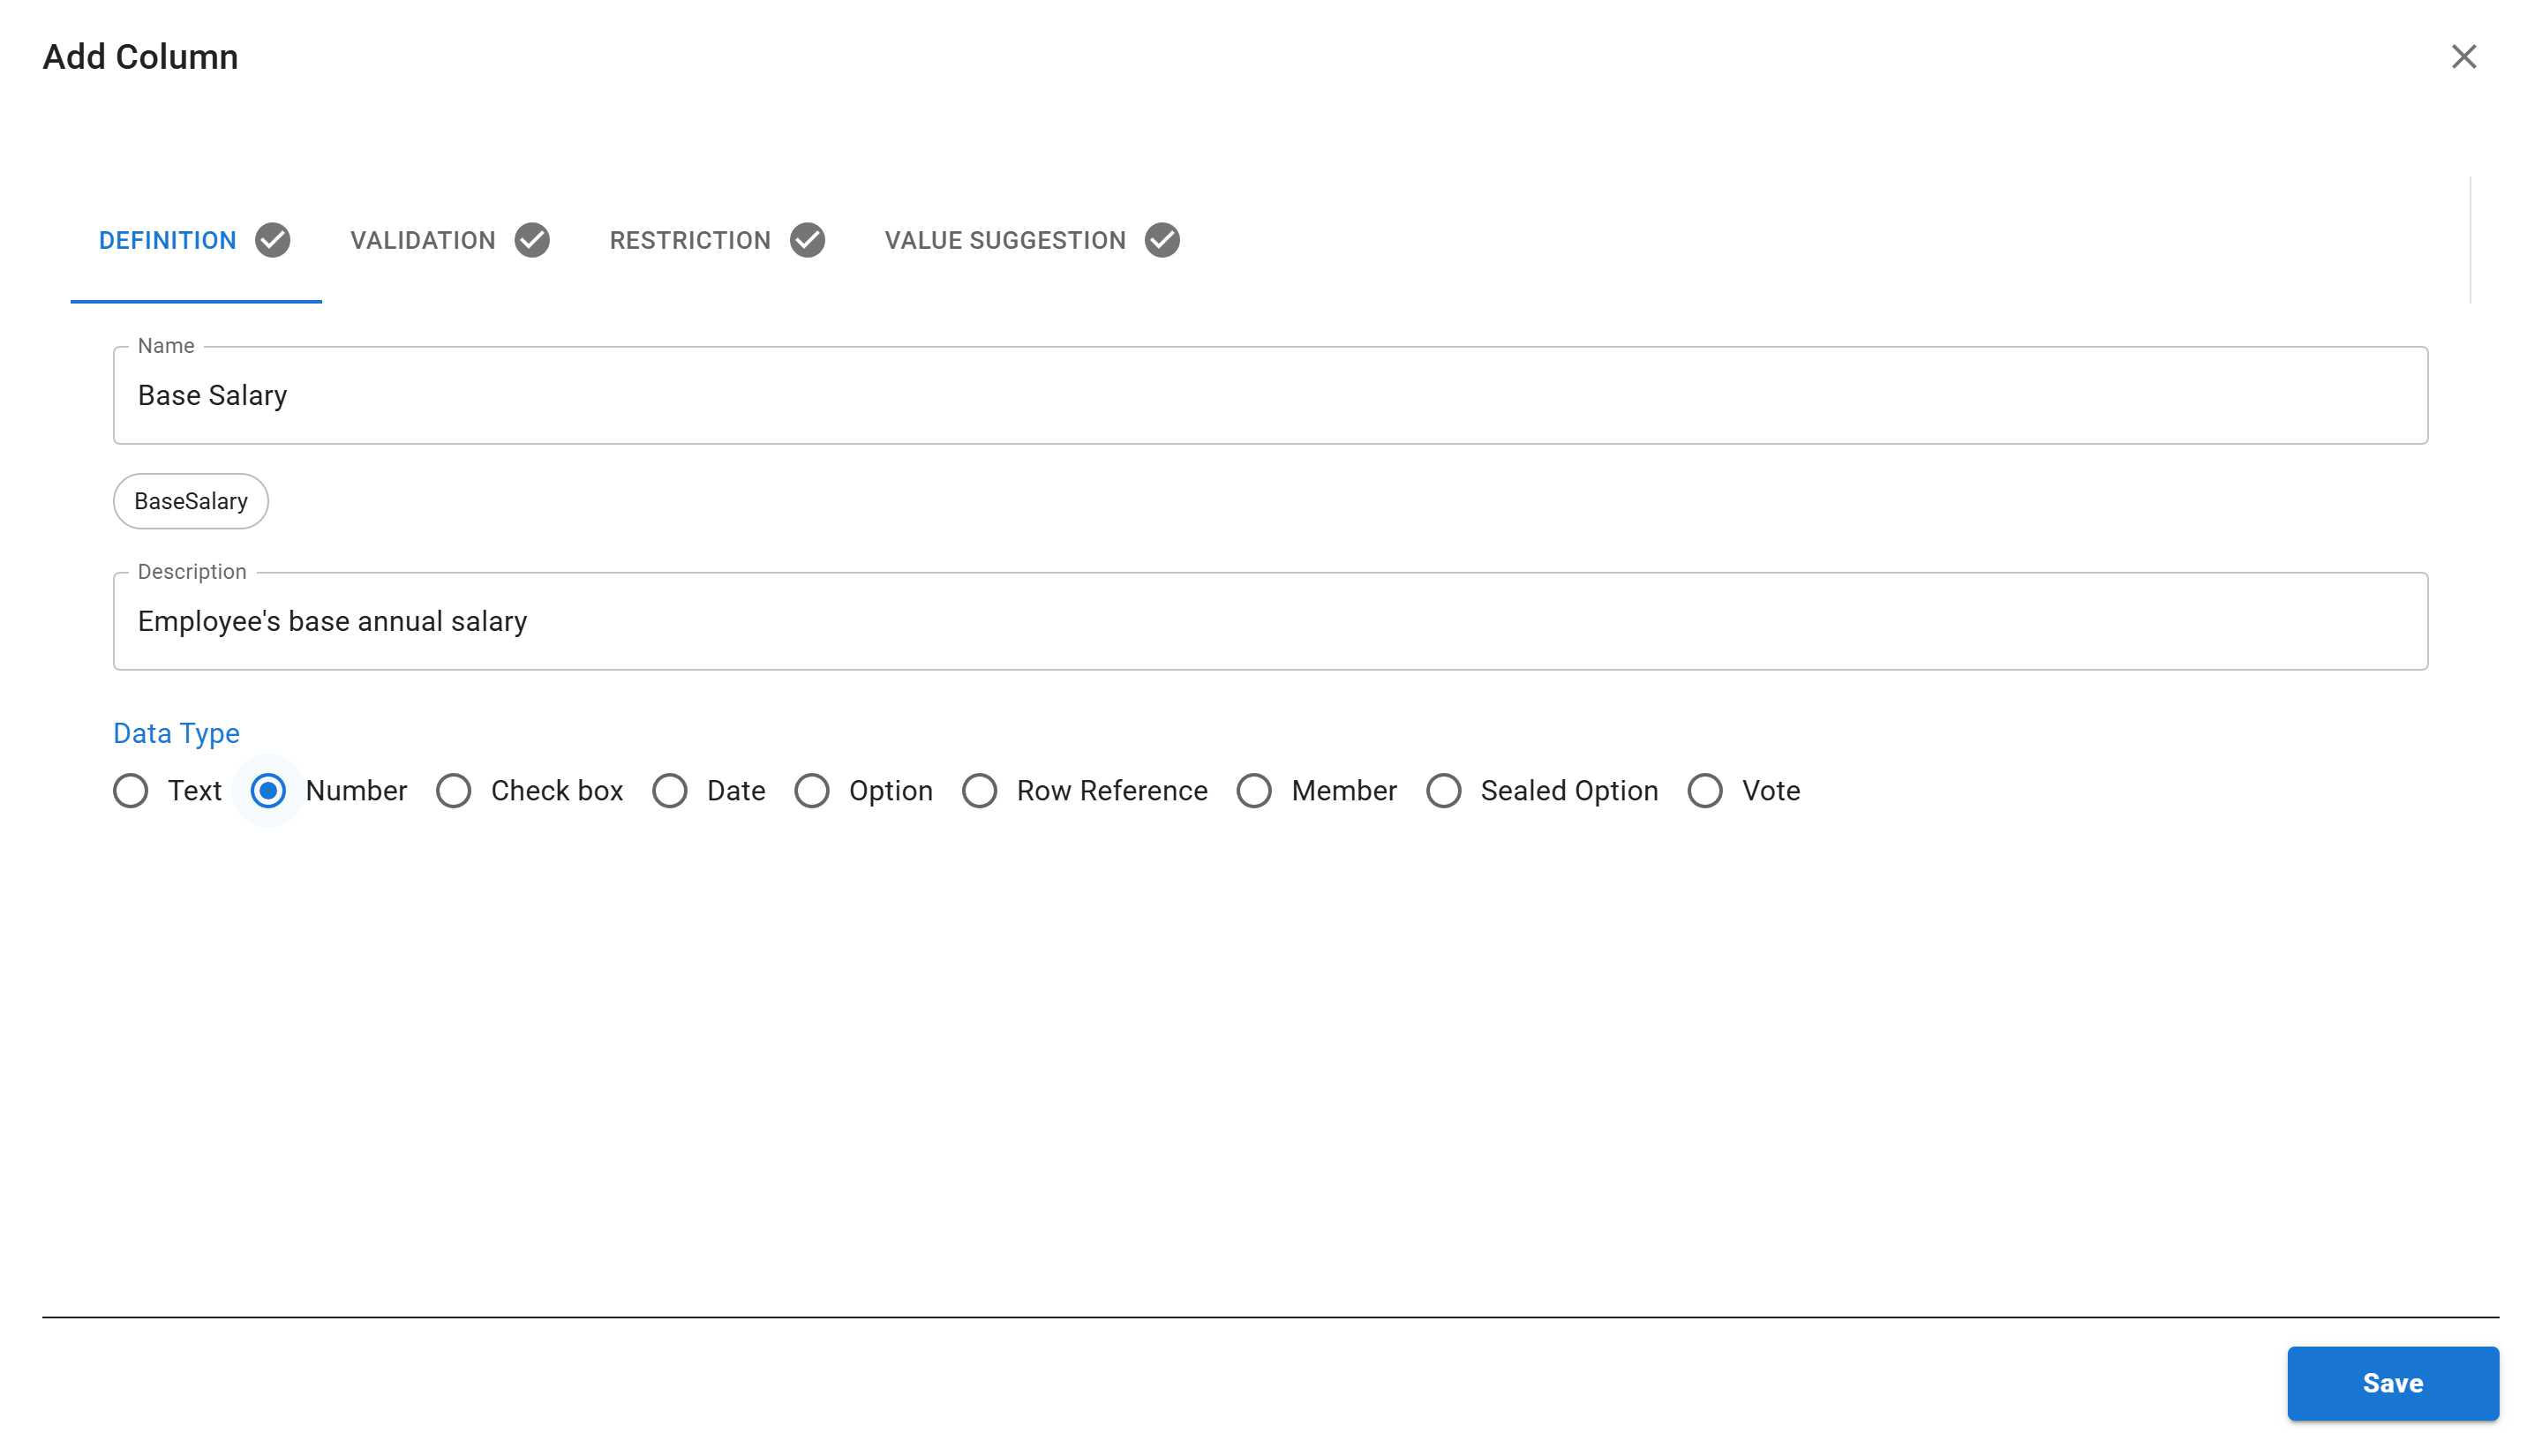
Step 1: Create the Column
Section titled “Step 1: Create the Column”First, we’ll create a Number column for storing salary information.
- Right-click on the data grid area
- Select “Add Column” from the context menu
- Fill in the column details:
- Name:
Base Salary - Description:
Employee's base annual salary - Data Type: Select Number
- Name:
Step 2: Access the Validation Tab
Section titled “Step 2: Access the Validation Tab”After filling in the basic column information, click on the Validation tab at the top of the dialog.

You’ll see:
- Enabled Rules section - Currently shows “No validation rules defined”
- Add Validation button - Click this to add a new rule
Step 3: Choose a Validation Type
Section titled “Step 3: Choose a Validation Type”Click the “ADD VALIDATION” button to see available validation types:

The available validation types depend on your column’s data type:
- Required - Make the field mandatory
- Min Value - Set minimum value (for Number columns)
- Max Value - Set maximum value (for Number columns)
- Predicate (Q-Expression) - Custom validation using expressions
For our salary column, select “Min Value”.
Step 4: Configure the Validation Rule
Section titled “Step 4: Configure the Validation Rule”The “Add Validation Rule” dialog appears:
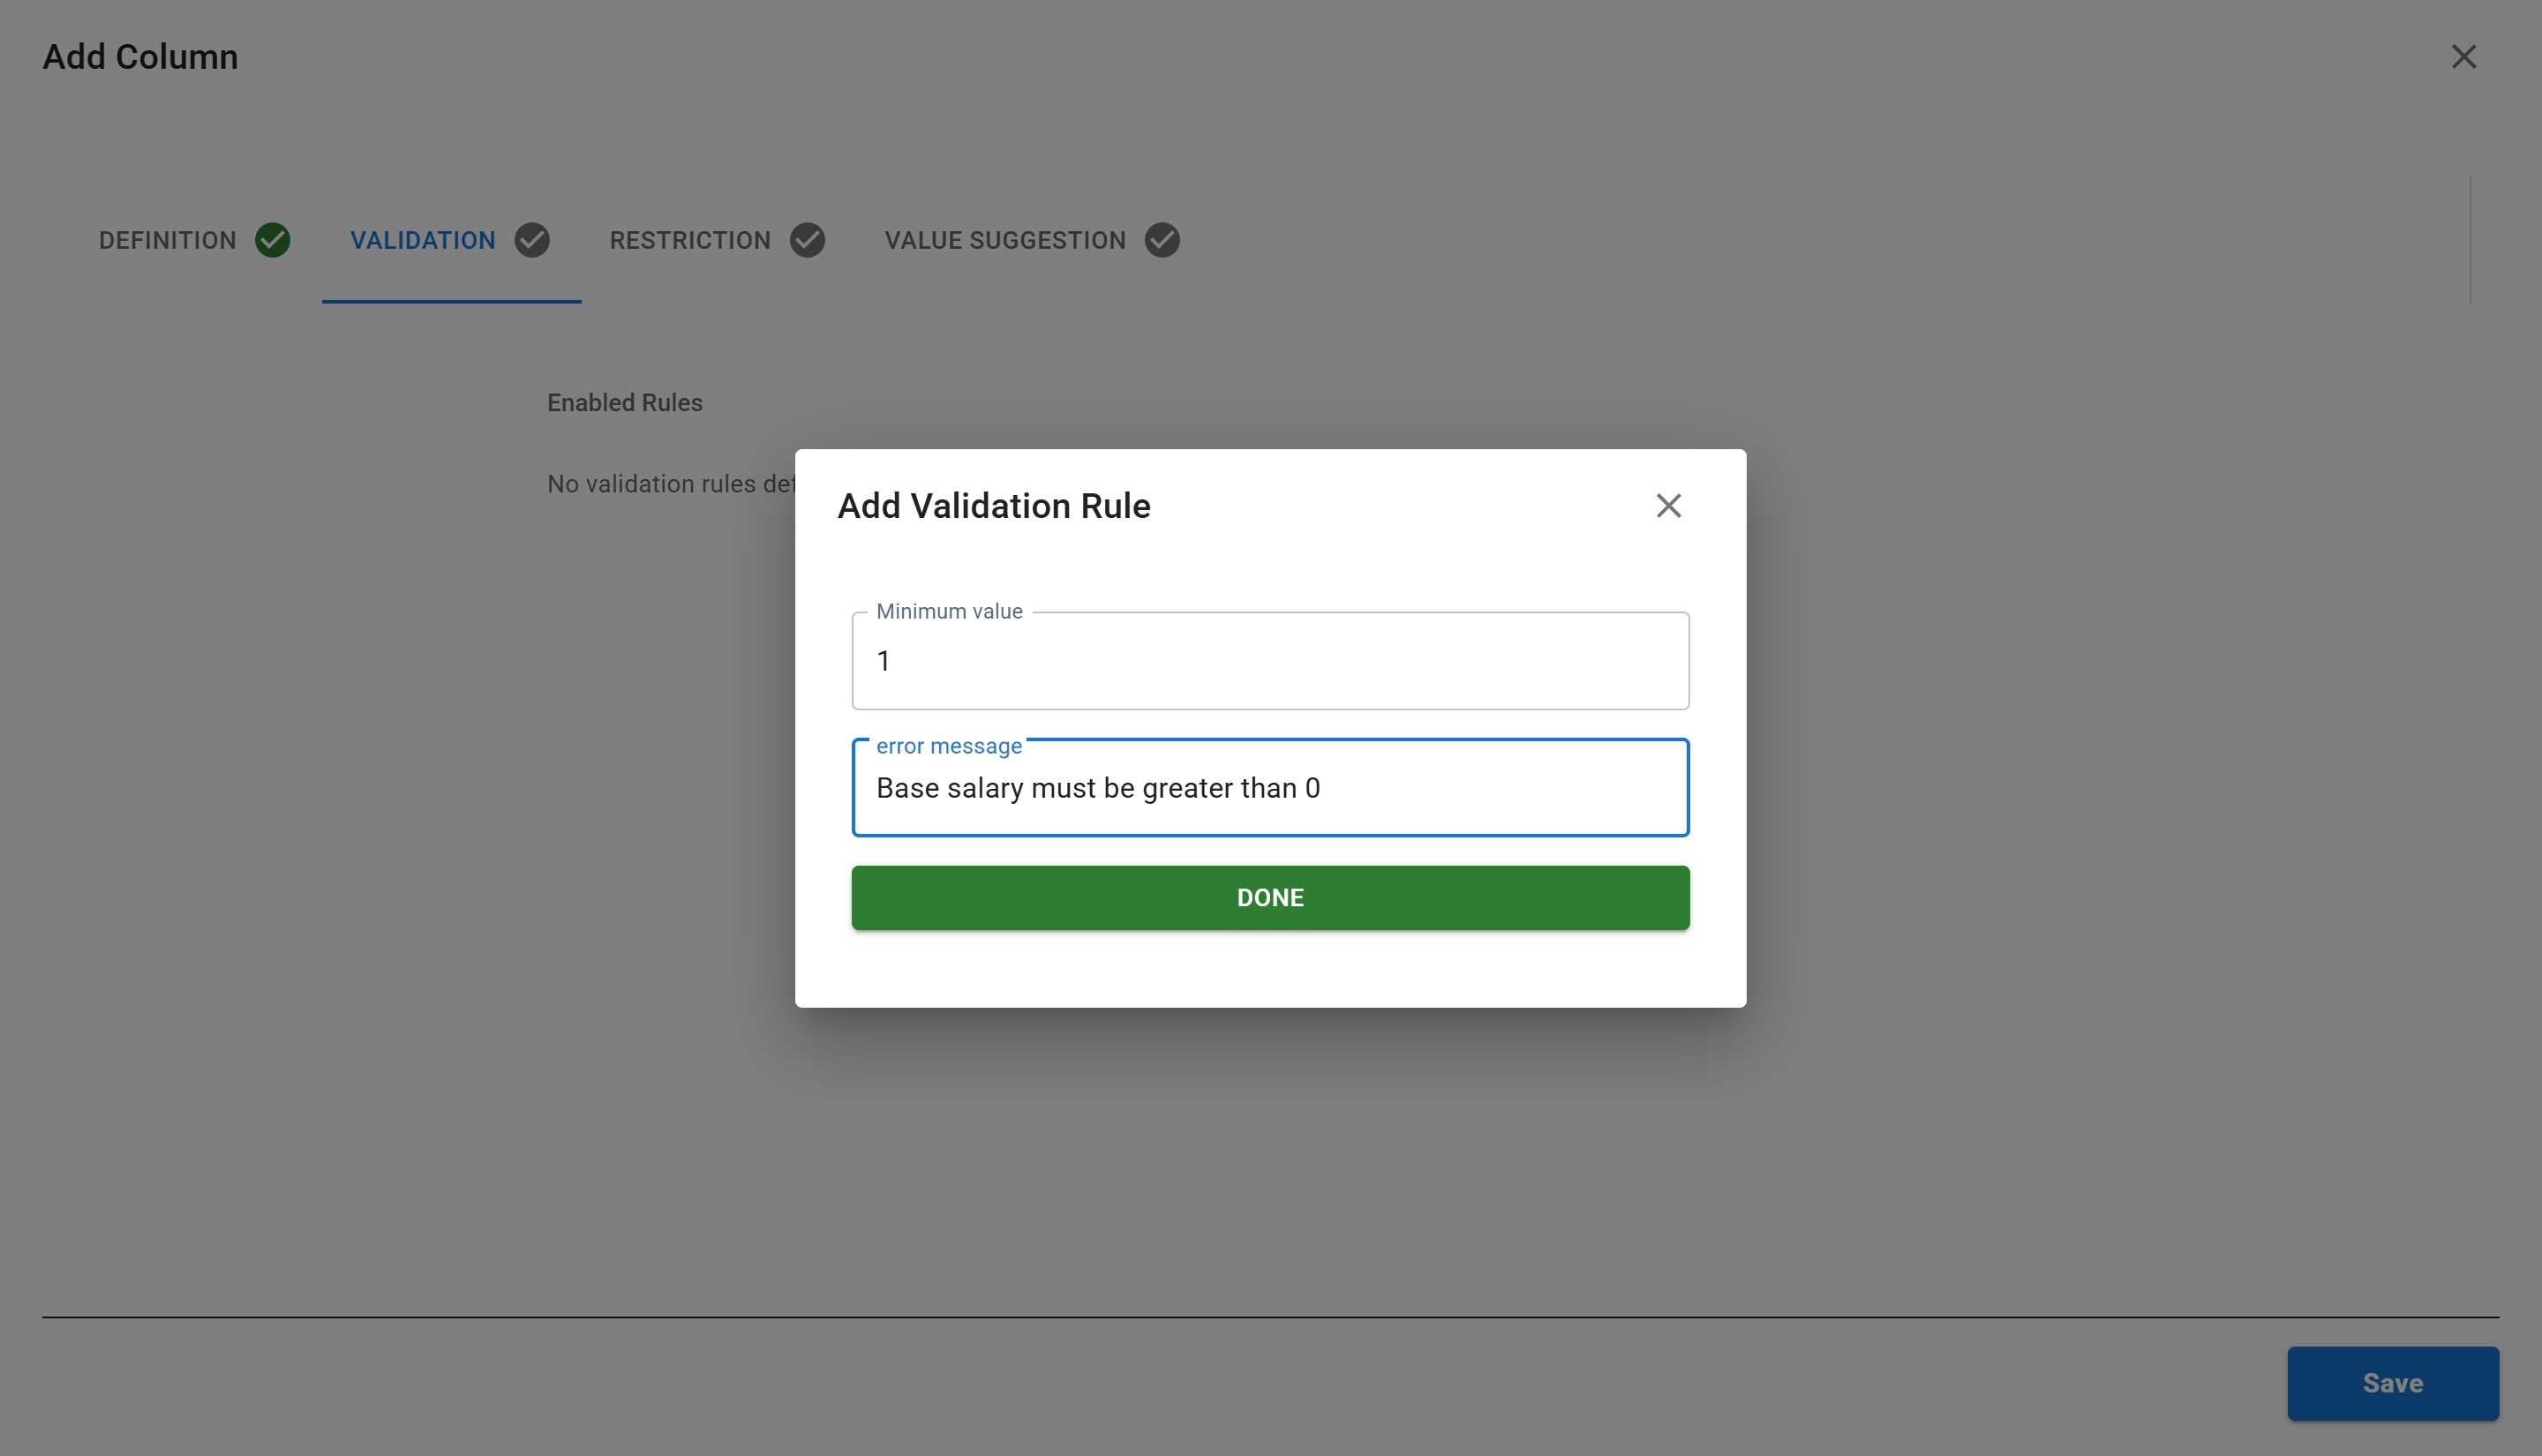
Configure the rule:
- Minimum value: Enter
1(this ensures salary is greater than 0) - Error message: Enter
Base salary must be greater than 0- This message will be shown to users if they enter 0 or negative values
- Make error messages clear and actionable
Click “DONE” to add the rule.
Step 5: Review and Save
Section titled “Step 5: Review and Save”The validation rule now appears in the Enabled Rules section:
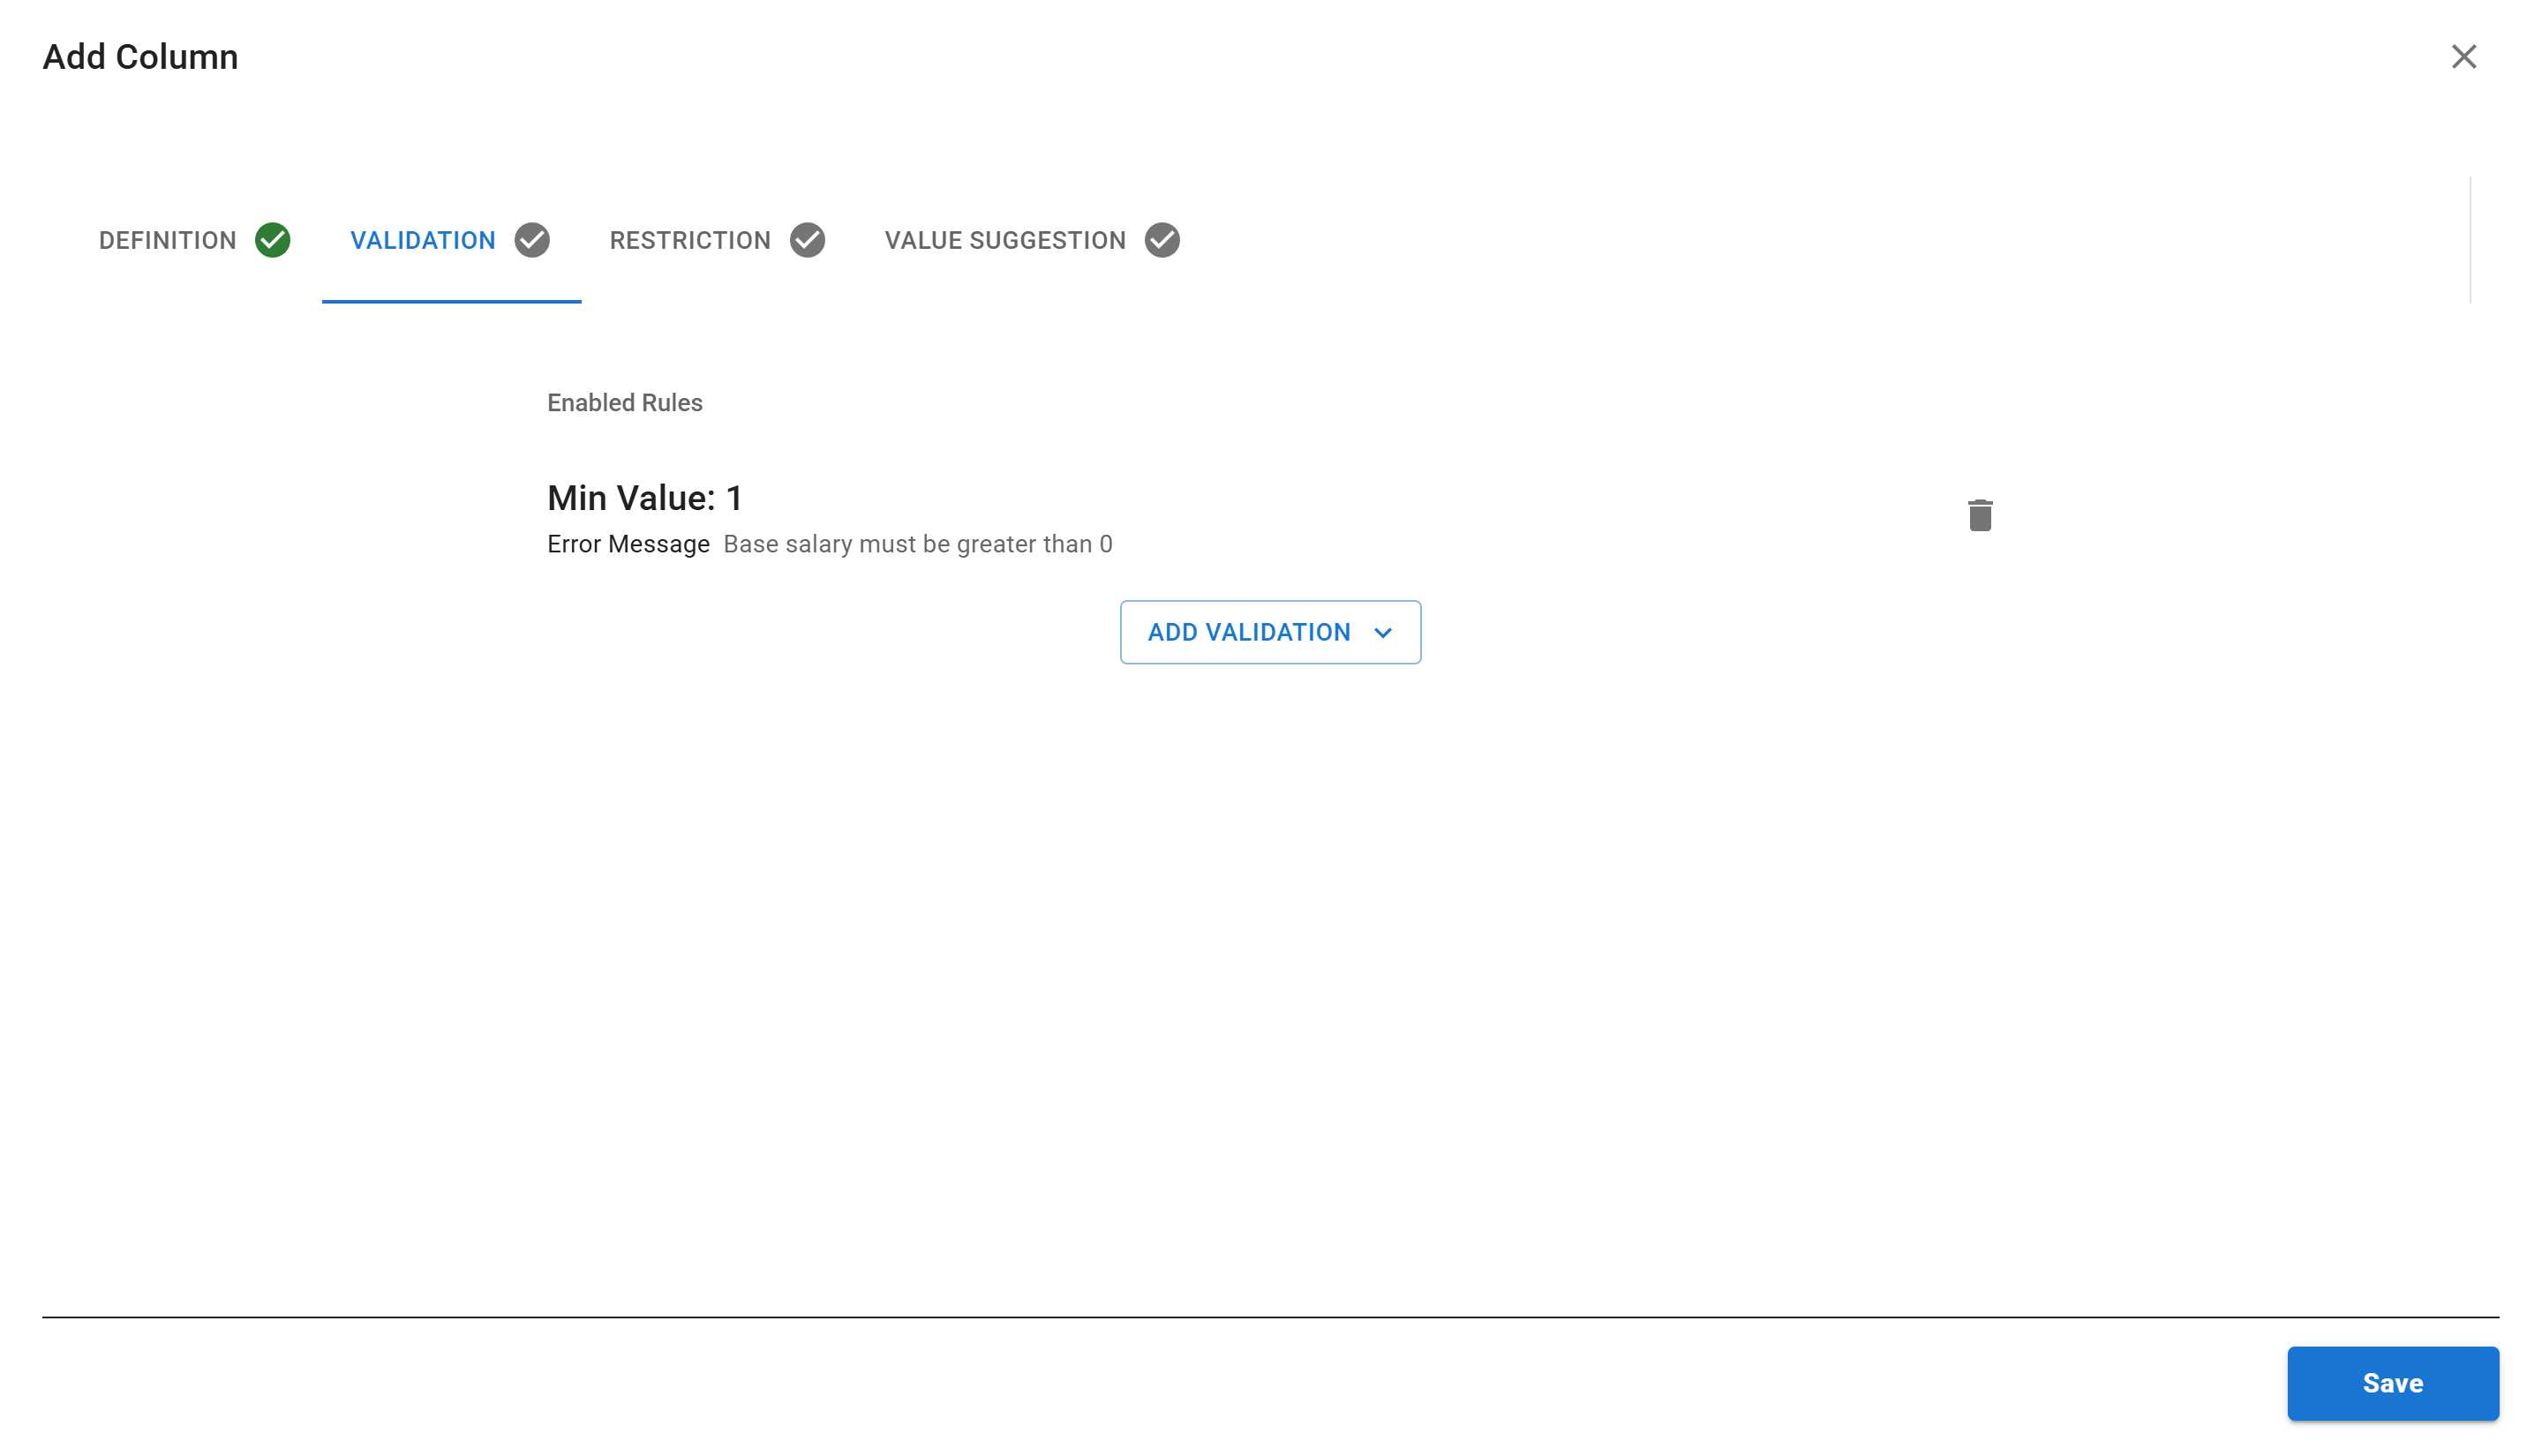
You’ll see:
- Min Value: 1 - The rule type and value
- Error Message - Your custom error message
- Delete button (trash icon) - Remove the rule if needed
Click “SAVE” to create the column with validation.
Seeing Validation in Action
Section titled “Seeing Validation in Action”Now let’s test the validation rule by adding a new employee record. This will show you exactly how validation protects your data.
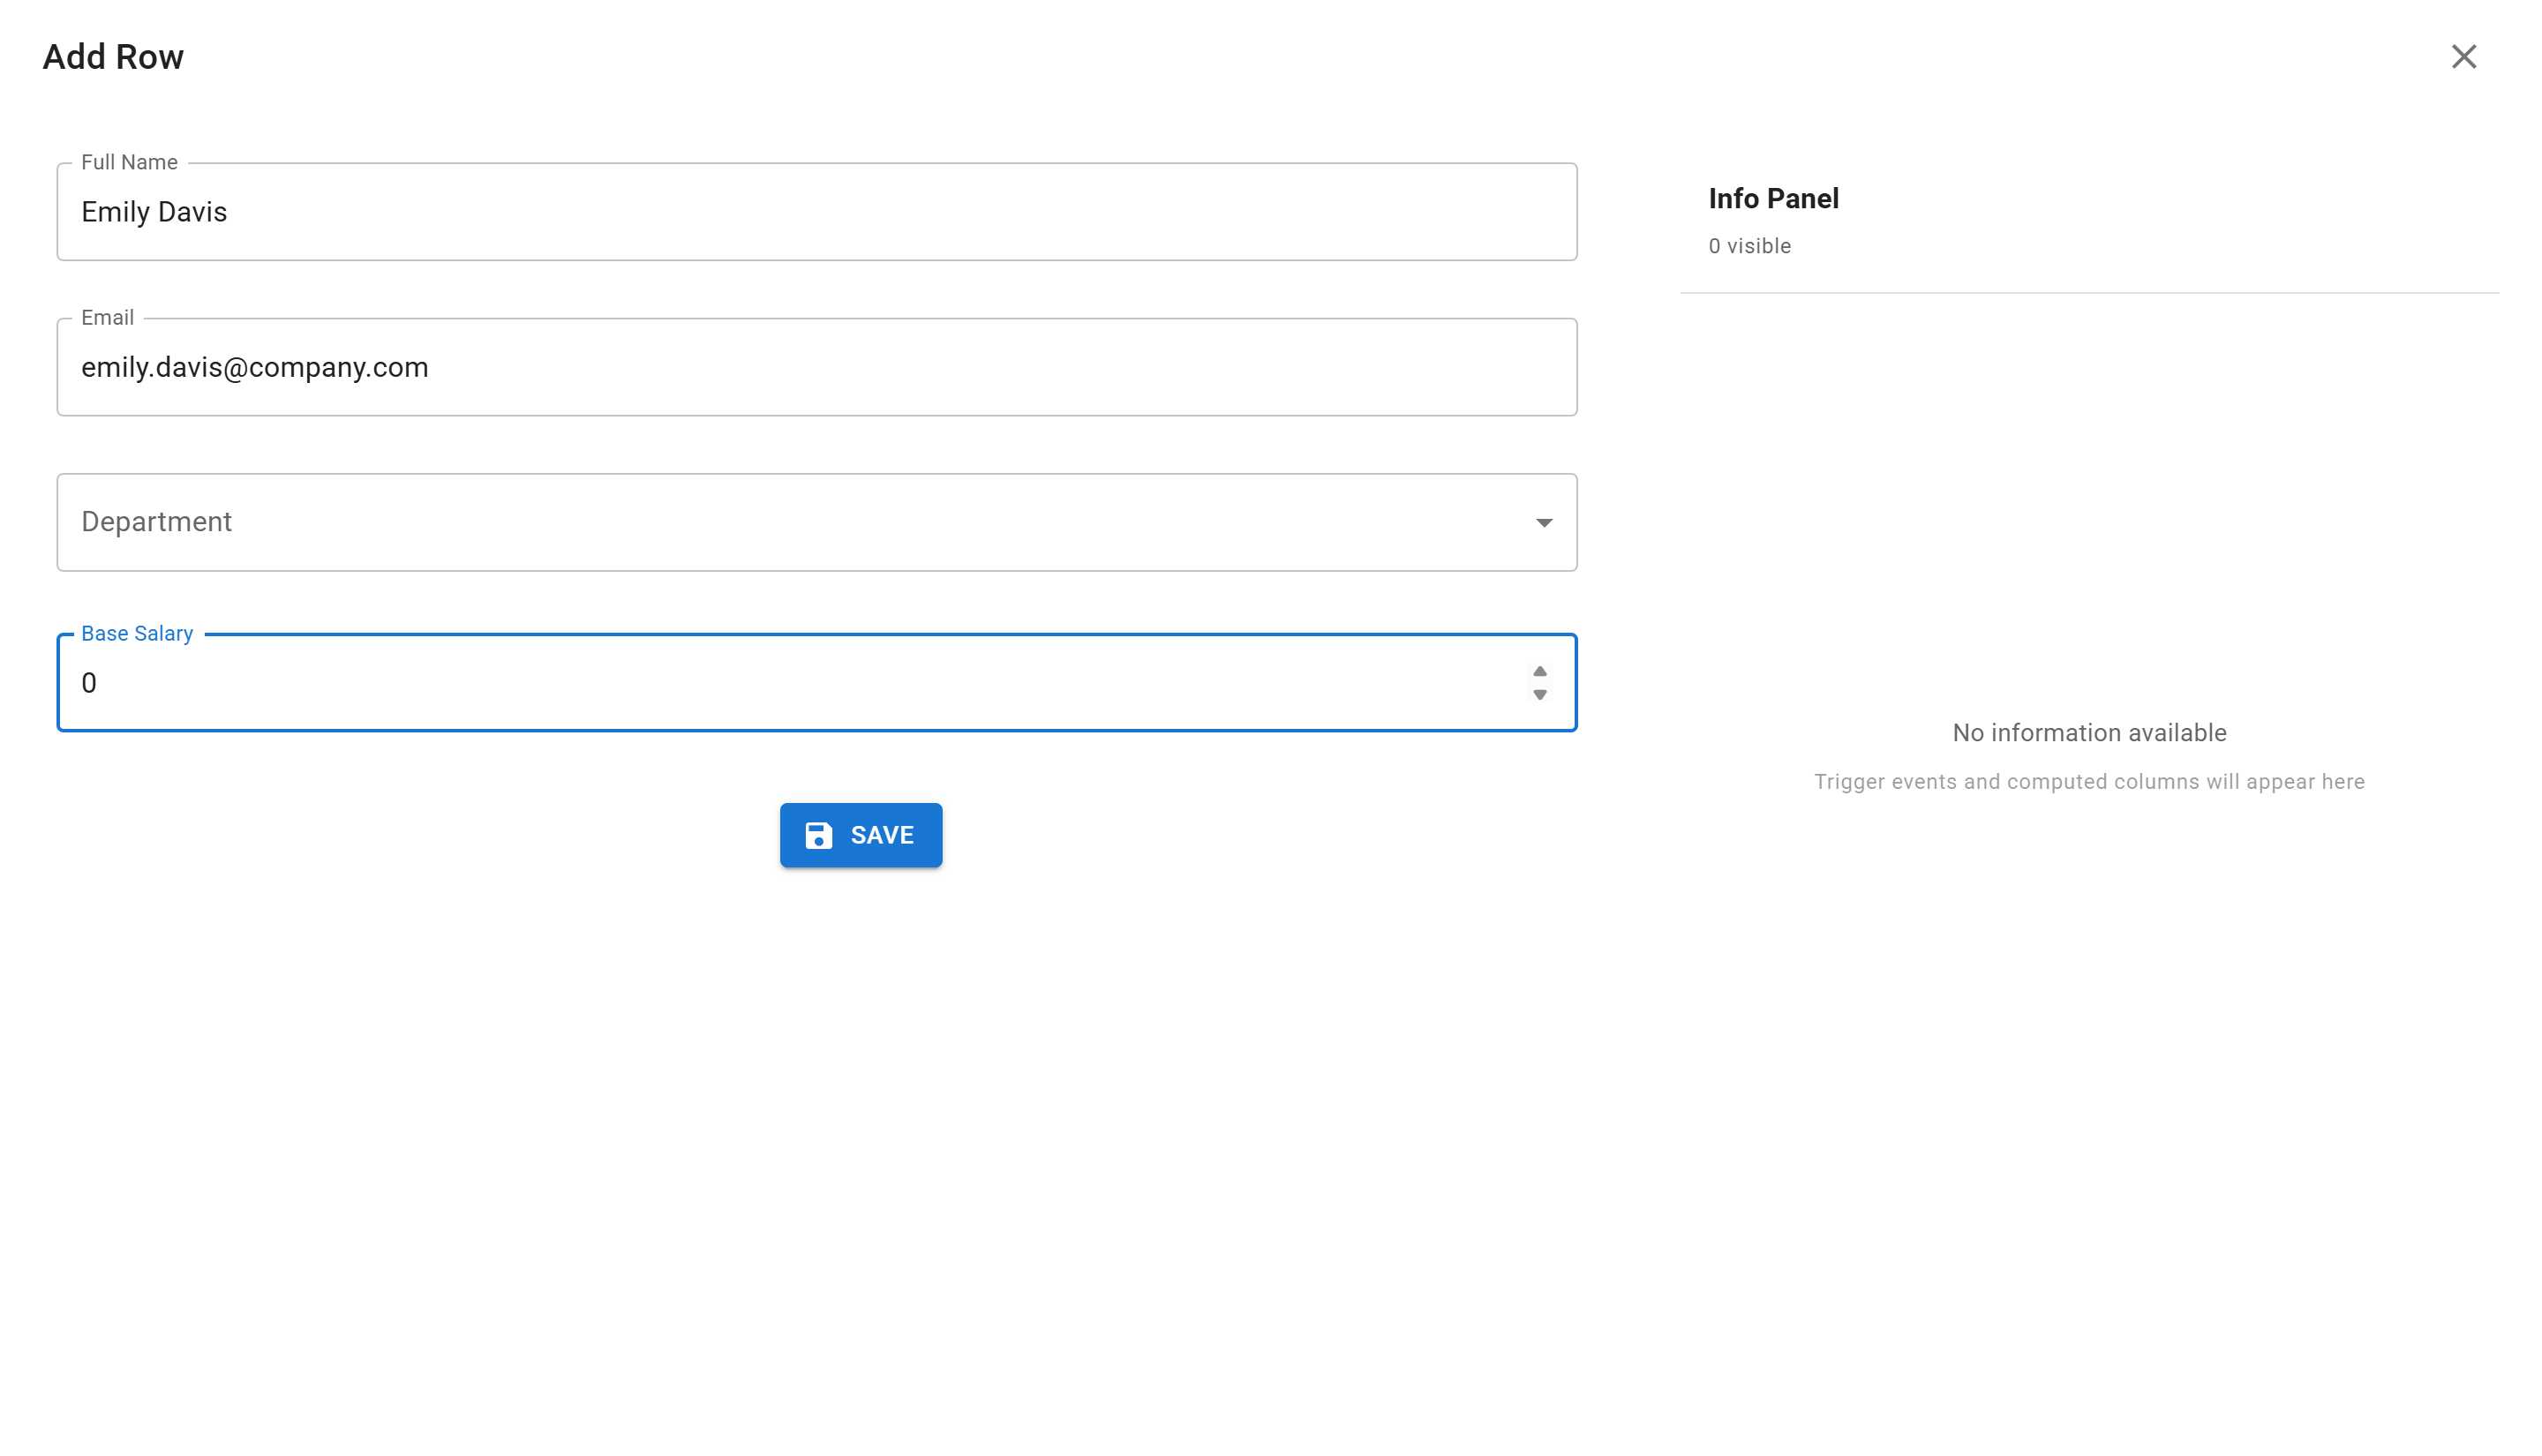
Step 6: Open the Add Row Form
Section titled “Step 6: Open the Add Row Form”Click the “Add Row” button in the toolbar to open the form.

The form shows all your columns, including the new Base Salary field.
Step 7: Try Entering Invalid Data
Section titled “Step 7: Try Entering Invalid Data”Let’s test the validation by entering invalid data:
- Fill in the form:
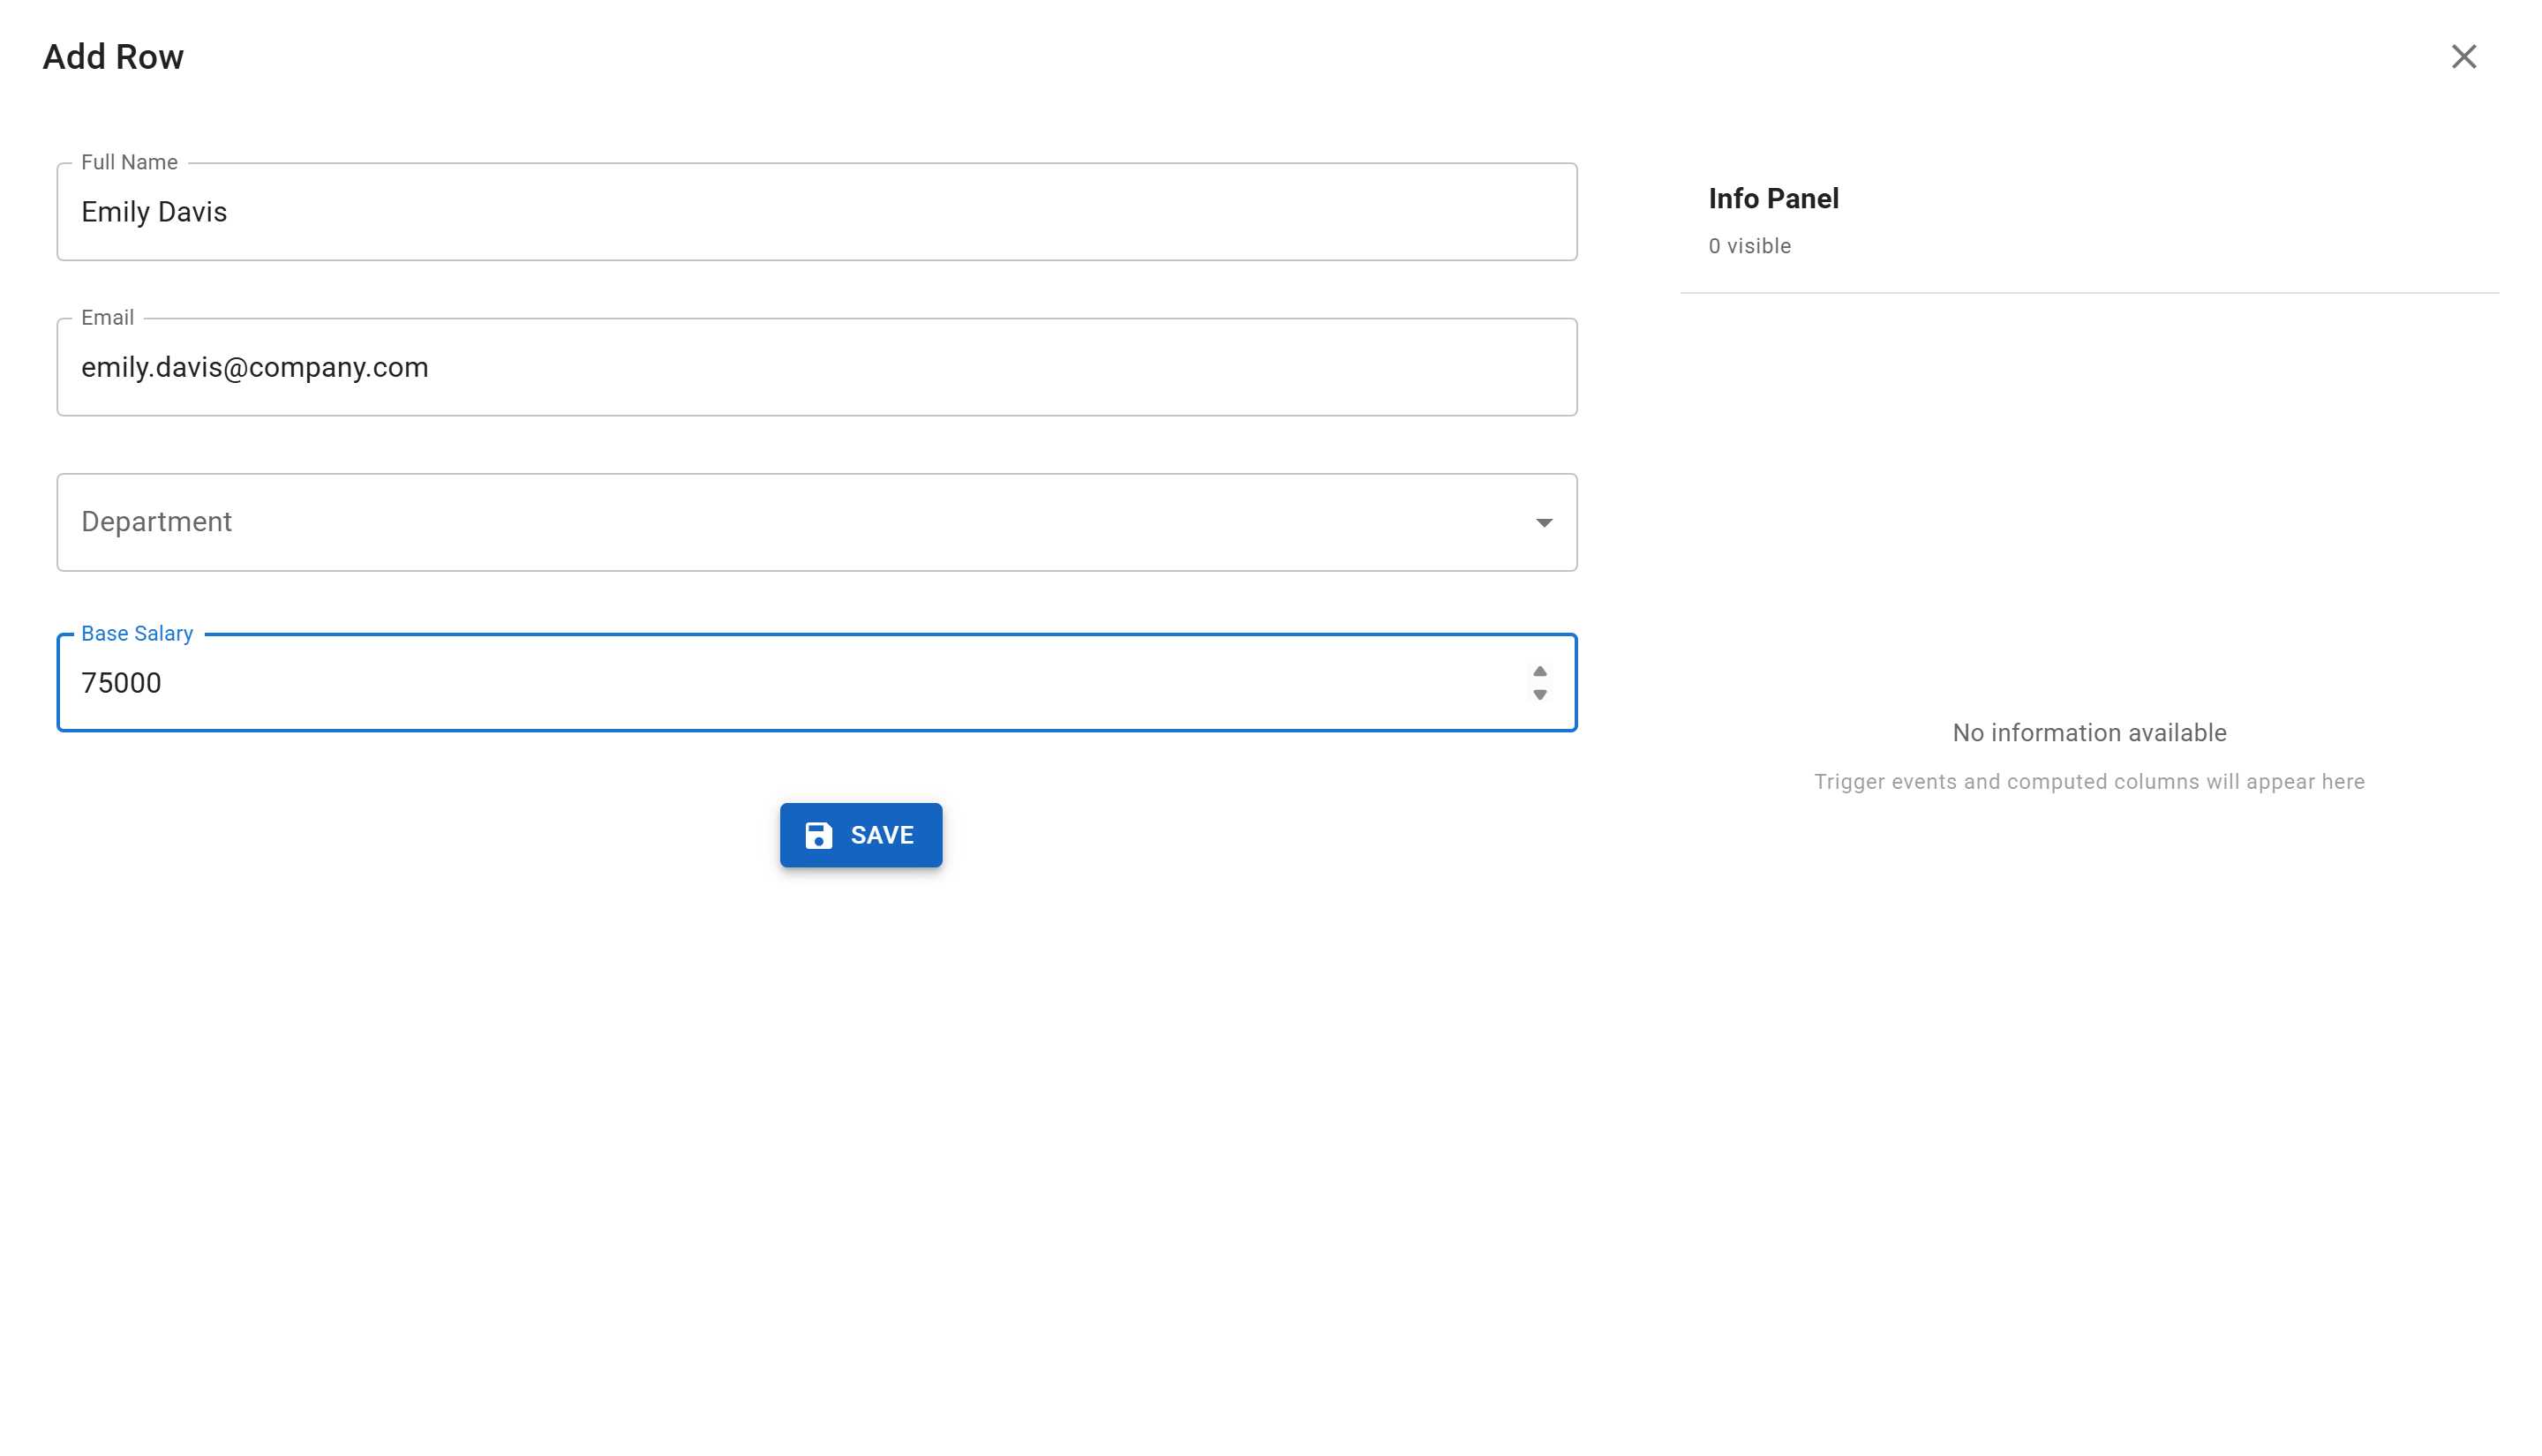
- Full Name:
Emily Davis - Email:
emily.davis@company.com - Base Salary: Enter
0
- Full Name:
- Click “Save”
Step 8: See the Validation Error
Section titled “Step 8: See the Validation Error”The validation rule catches the invalid value:

Notice:
- ❌ The row is not saved
- ⚠️ An error message appears below the Base Salary field
- 📝 The message shows your custom text: “Base salary must be greater than 0”
- 🔍 The field remains editable so you can correct it
Step 9: Enter Valid Data
Section titled “Step 9: Enter Valid Data”Now correct the value:
- Change Base Salary to
75000
Notice the error message disappears immediately when you enter a valid value.
- Click “Save”
Step 10: Successful Save
Section titled “Step 10: Successful Save”The data is now saved successfully:
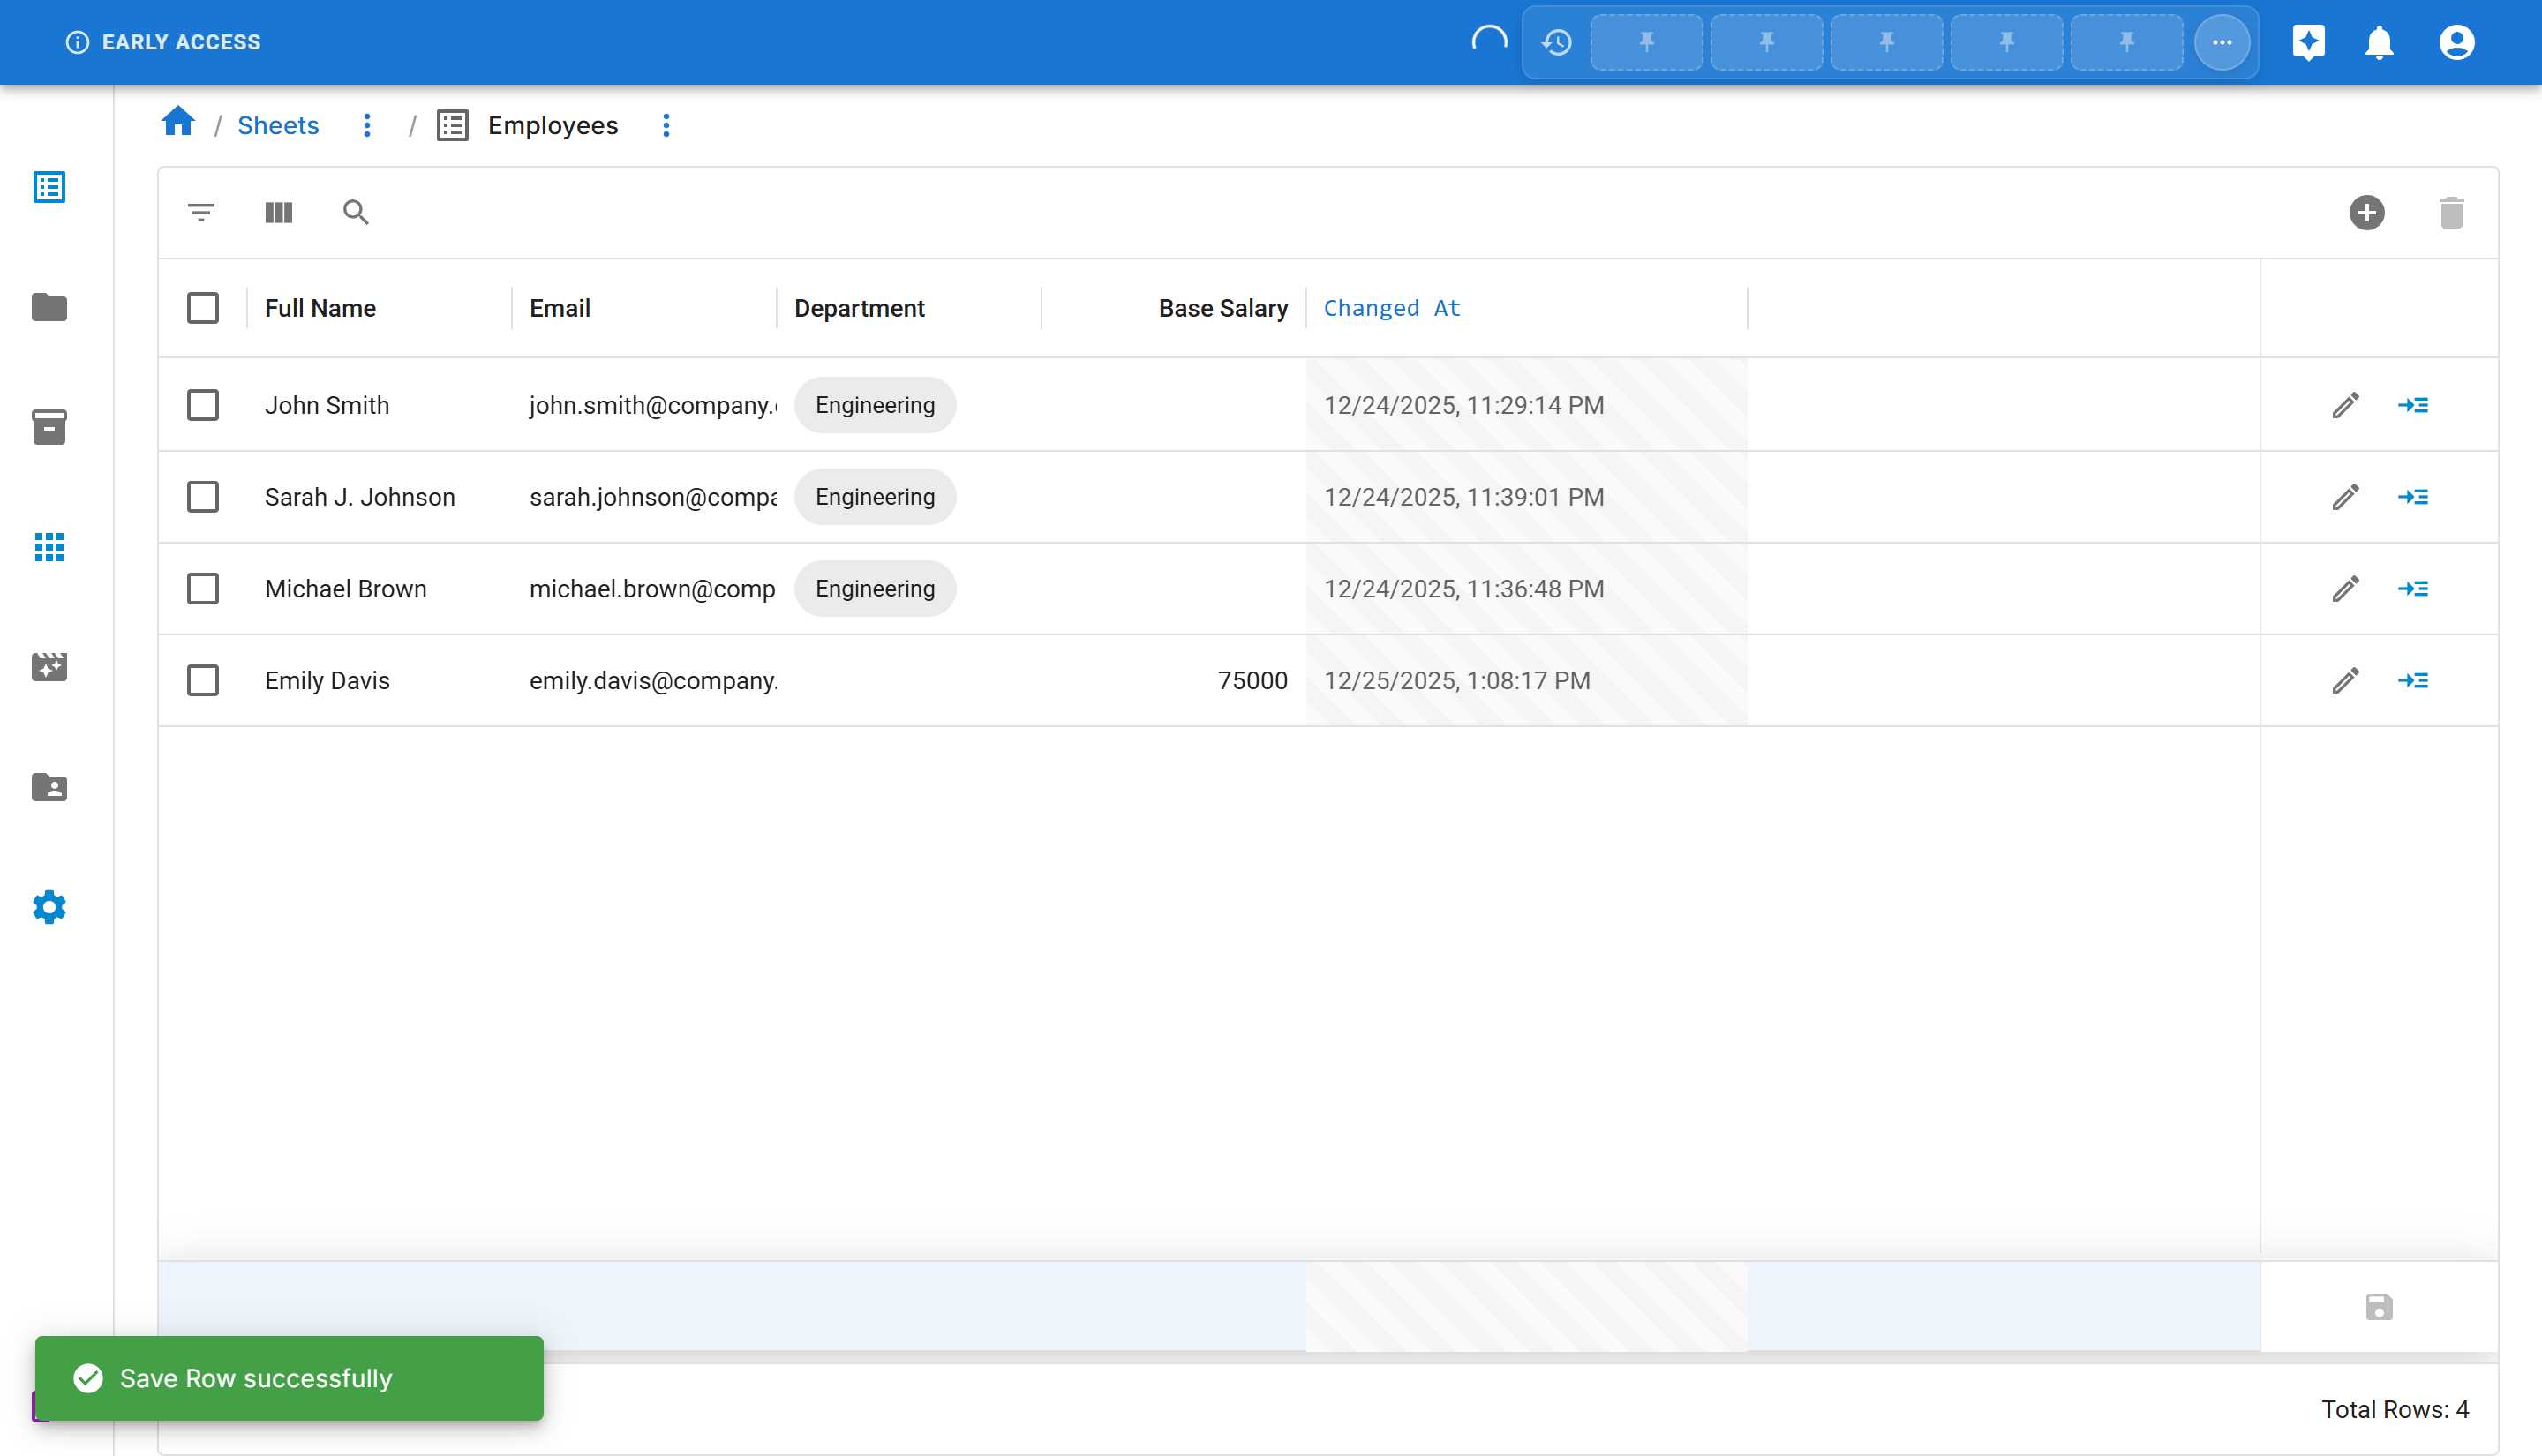
You’ll see:
- ✅ Success message: “Save Row successfully”
- 📊 The new row appears in your data grid
- 💰 Base Salary shows 75000
- ✨ All validation rules passed
Available Validation Types
Section titled “Available Validation Types”Required
Section titled “Required”Makes the field mandatory - users must enter a value before saving.
Use cases:
- Essential information like employee names, email addresses
- Required dates like start dates or due dates
- Mandatory selections from option lists
Configuration:
- Simply enable/disable the required rule
- Error message: “This field is required”
Min Value (Number columns only)
Section titled “Min Value (Number columns only)”Sets the minimum acceptable value for a number field.
Use cases:
- Salaries, wages (must be positive)
- Quantities (cannot be negative)
- Percentages (minimum 0)
- Age restrictions (minimum 18)
Configuration:
- Minimum value: The lowest acceptable number
- Error message: Custom message explaining the requirement
Max Value (Number columns only)
Section titled “Max Value (Number columns only)”Sets the maximum acceptable value for a number field.
Use cases:
- Discount percentages (maximum 100)
- Age limits (maximum retirement age)
- Budget caps (maximum spending limit)
- Quantity limits
Configuration:
- Maximum value: The highest acceptable number
- Error message: Custom message explaining the requirement
Predicate (Q-Expression)
Section titled “Predicate (Q-Expression)”Create custom validation logic using Q-Expressions (Sheety’s query language).
Use cases:
- Complex business rules
- Cross-field validation (comparing multiple columns)
- Pattern matching
- Conditional requirements
Configuration:
- Q-Expression: Write your validation logic
- Error message: Explain why the validation failed
Learn more about Q-Expressions in our Q Expressions Reference.
Multiple Validation Rules
Section titled “Multiple Validation Rules”You can add multiple validation rules to a single column. For example, a salary column might have:
- Required - Must have a value
- Min Value: 1 - Must be greater than zero
- Max Value: 1000000 - Cannot exceed cap
All rules must pass for data to be valid. Rules are checked in the order they appear.
How Validation Works
Section titled “How Validation Works”When Validation is Checked
Section titled “When Validation is Checked”Validation rules are enforced when:
- Adding new rows - Before data is saved
- Editing existing data - When modifying cell values
- Importing data - During bulk data import
- API submissions - When data is submitted via API
What Happens When Validation Fails
Section titled “What Happens When Validation Fails”If a validation rule fails:
- The data is not saved
- An error message appears showing which validation failed
- The field is highlighted in the UI
- Users must correct the data before proceeding
User Experience
Section titled “User Experience”Good validation provides:
- Clear error messages - Tell users exactly what’s wrong
- Immediate feedback - Show errors as soon as possible
- Helpful guidance - Explain how to fix the issue
- Non-blocking - Allow users to continue working on other fields
Editing Validation Rules
Section titled “Editing Validation Rules”To modify existing validation rules:
- Right-click on the column header
- Select “Edit [Column Name]”
- Click the Validation tab
- Click the delete icon (trash) to remove a rule
- Click “ADD VALIDATION” to add new rules
- Click “SAVE” to apply changes
Common Validation Scenarios
Section titled “Common Validation Scenarios”Positive Numbers Only
Section titled “Positive Numbers Only”Min Value: 0 or 1Error: "Value must be positive"Percentage Range
Section titled “Percentage Range”Min Value: 0Max Value: 100Error: "Must be between 0 and 100"Required Email
Section titled “Required Email”Required: YesError: "Email address is required"Budget Cap
Section titled “Budget Cap”Max Value: 50000Error: "Budget cannot exceed $50,000"Summary
Section titled “Summary”In this tutorial, you learned how to:
- ✅ Add validation rules to columns
- ✅ Create a minimum value validation for numbers
- ✅ Write clear, helpful error messages
- ✅ Understand when validation is enforced
Your sheet now has data quality controls to ensure clean, consistent data!