Adding Columns to Your Sheet
Now that you’ve created your first workbook and sheet, it’s time to define your data structure by adding columns. Columns in Sheety App are like fields in a database table - each column has a name, description, and data type that determines what kind of information it can store.
What You’ll Learn
Section titled “What You’ll Learn”- How to quickly add columns using right-click
- Creating columns with different data types
- Understanding the Add Column dialog
- Alternative ways to manage columns
Prerequisites
Section titled “Prerequisites”- A workbook with at least one sheet (complete Creating Your First Workbook if you haven’t already)
Understanding Columns
Section titled “Understanding Columns”Before we start adding columns, let’s understand what they are:
- Columns define the structure of your data (like “Name”, “Email”, “Department”)
- Each column has a data type that determines what values it can store
- Column names should be descriptive and easy to understand
- You can add, edit, or remove columns at any time
Step 1: Adding Columns with Right-Click (Recommended)
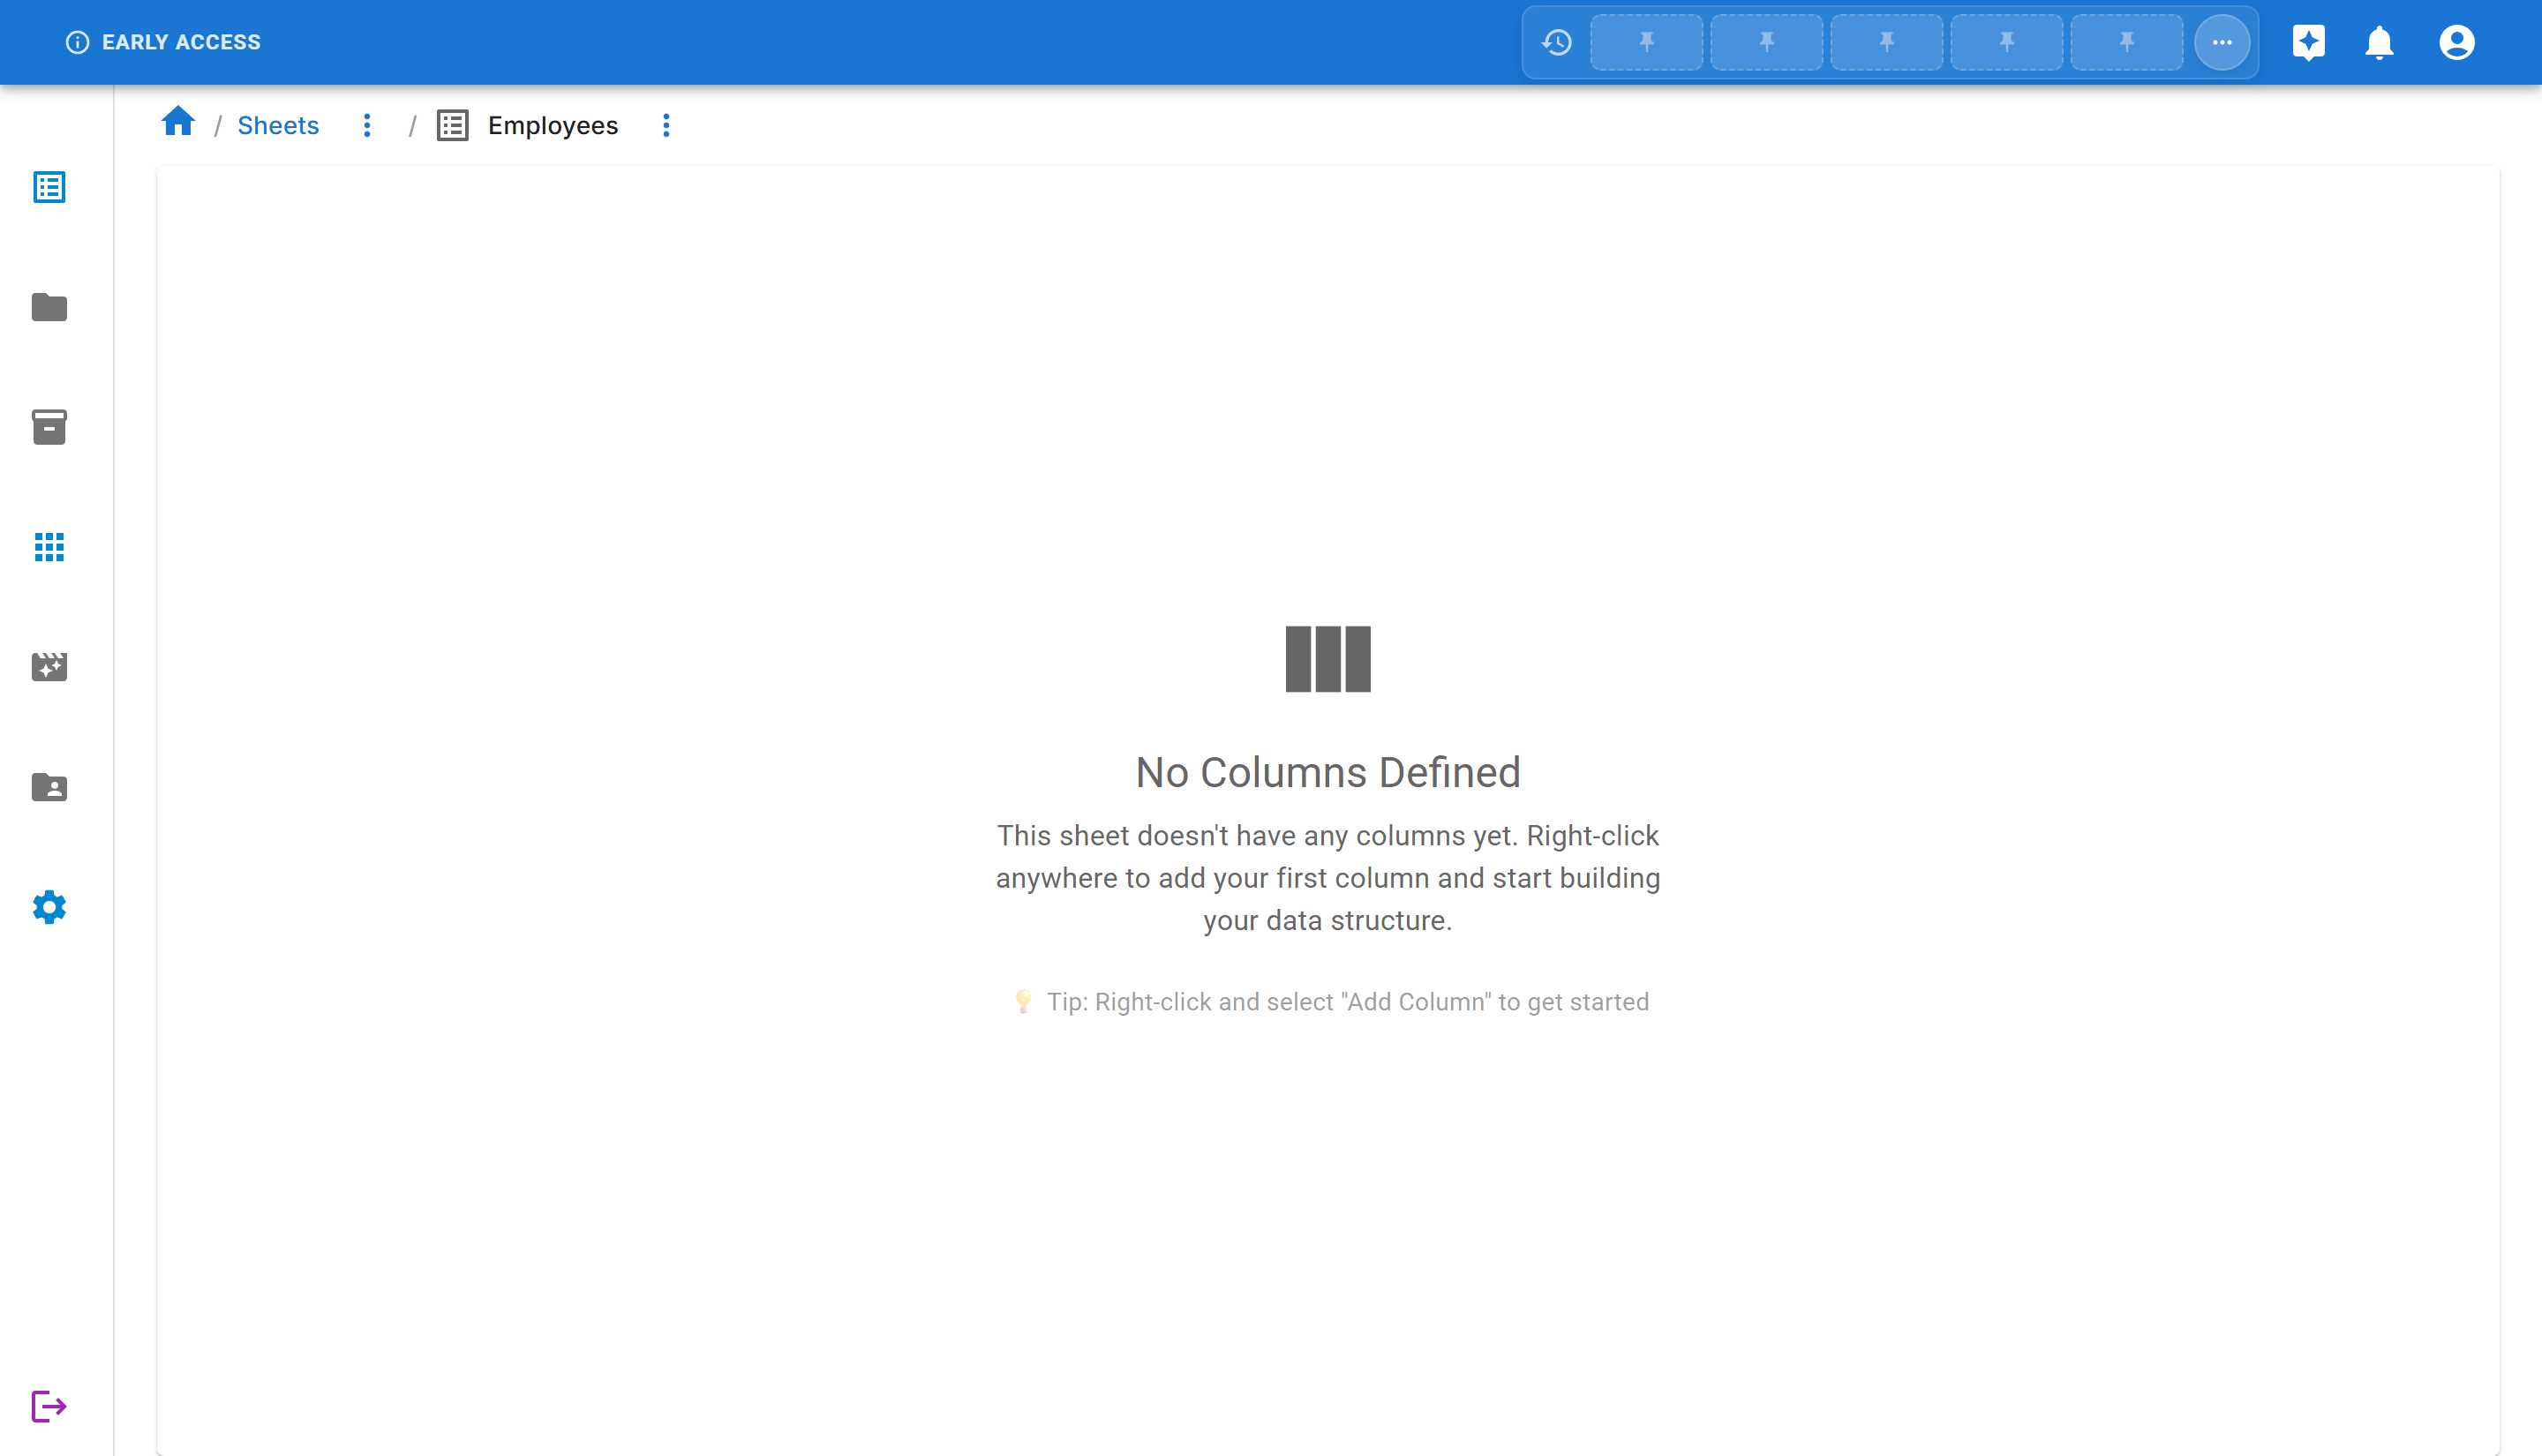
Section titled “Step 1: Adding Columns with Right-Click (Recommended)”The fastest way to add columns is by right-clicking directly on the data grid. This method works whether your sheet is empty or already contains data.
When you first create a sheet, it has no columns. You’ll see an empty sheet view with a helpful message:
Adding Your First Column
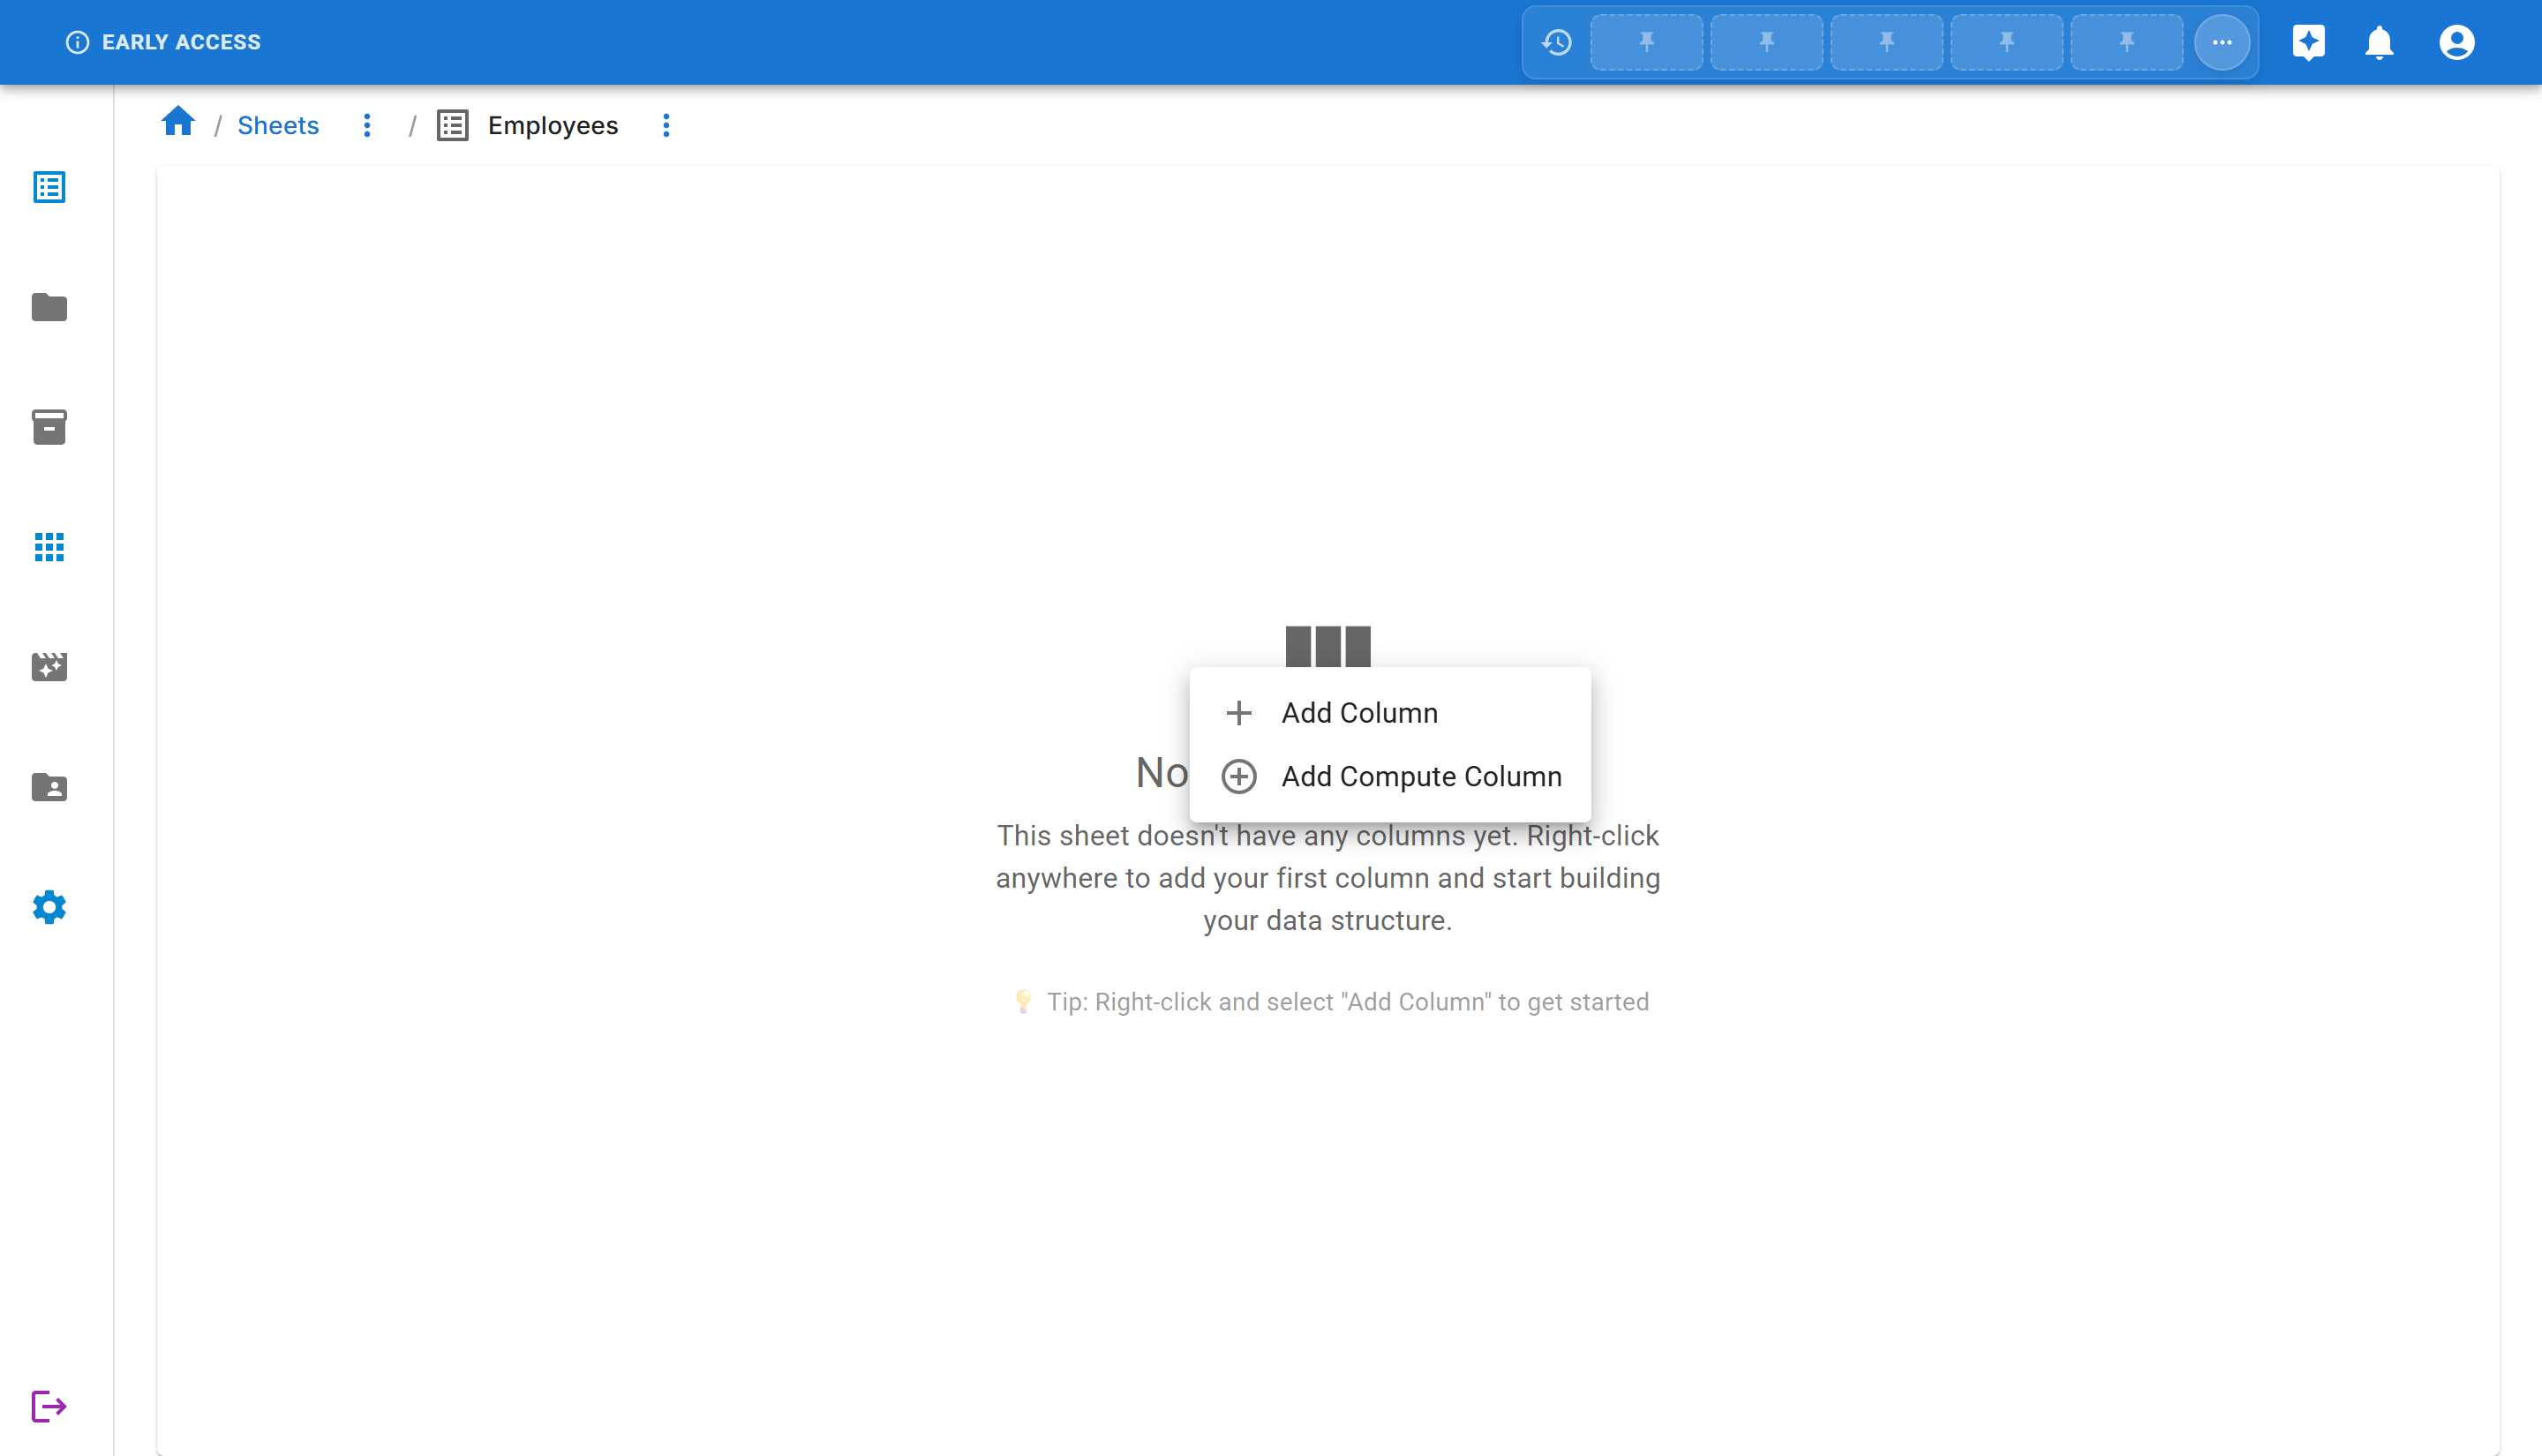
Section titled “Adding Your First Column”- Right-click anywhere on the data grid area (the center area of the sheet)
- This works on empty sheets or on sheets with existing data
- You can right-click on any empty space in the grid
-
Select “Add Column” from the context menu
-
The “Add Column” dialog will open directly

Step 2: Creating Your First Column
Section titled “Step 2: Creating Your First Column”Let’s add a “Full Name” column to store employee names.
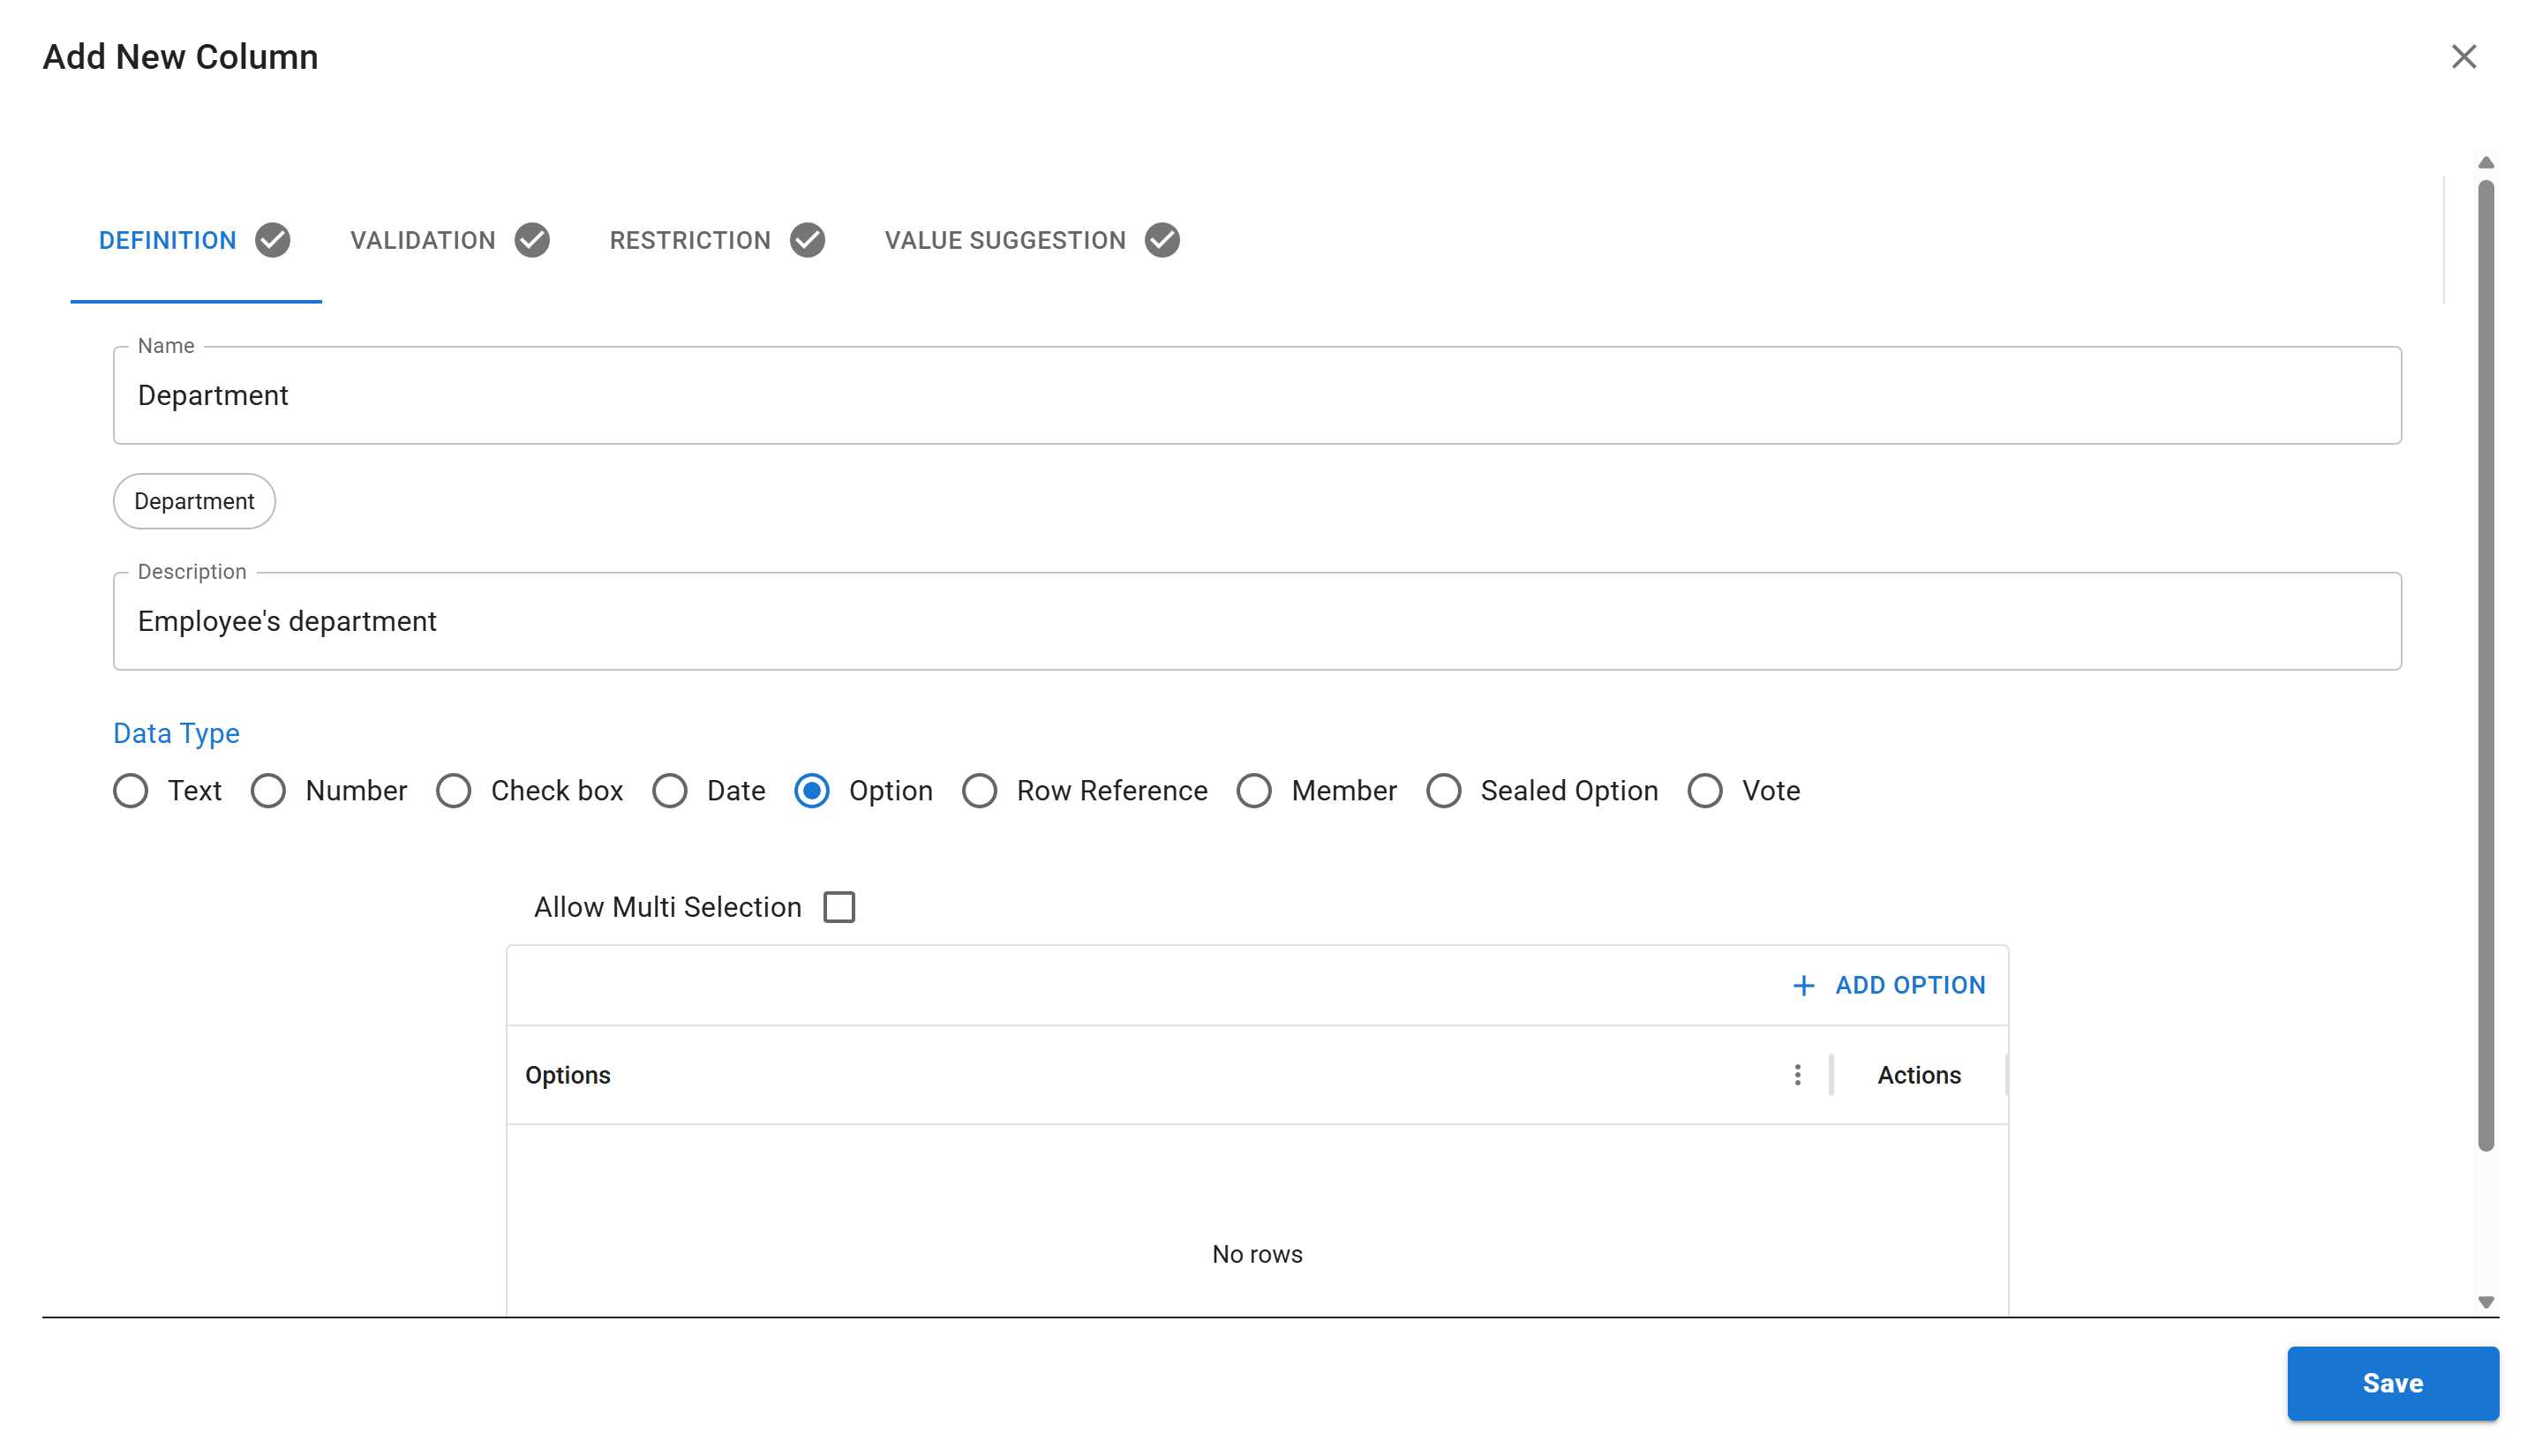
In the “Add Column” dialog that appeared, you’ll see four tabs:
- Definition - Basic column information
- Validation - Rules for data validation
- Restriction - Access and permission settings
- Value Suggestion - Auto-complete options
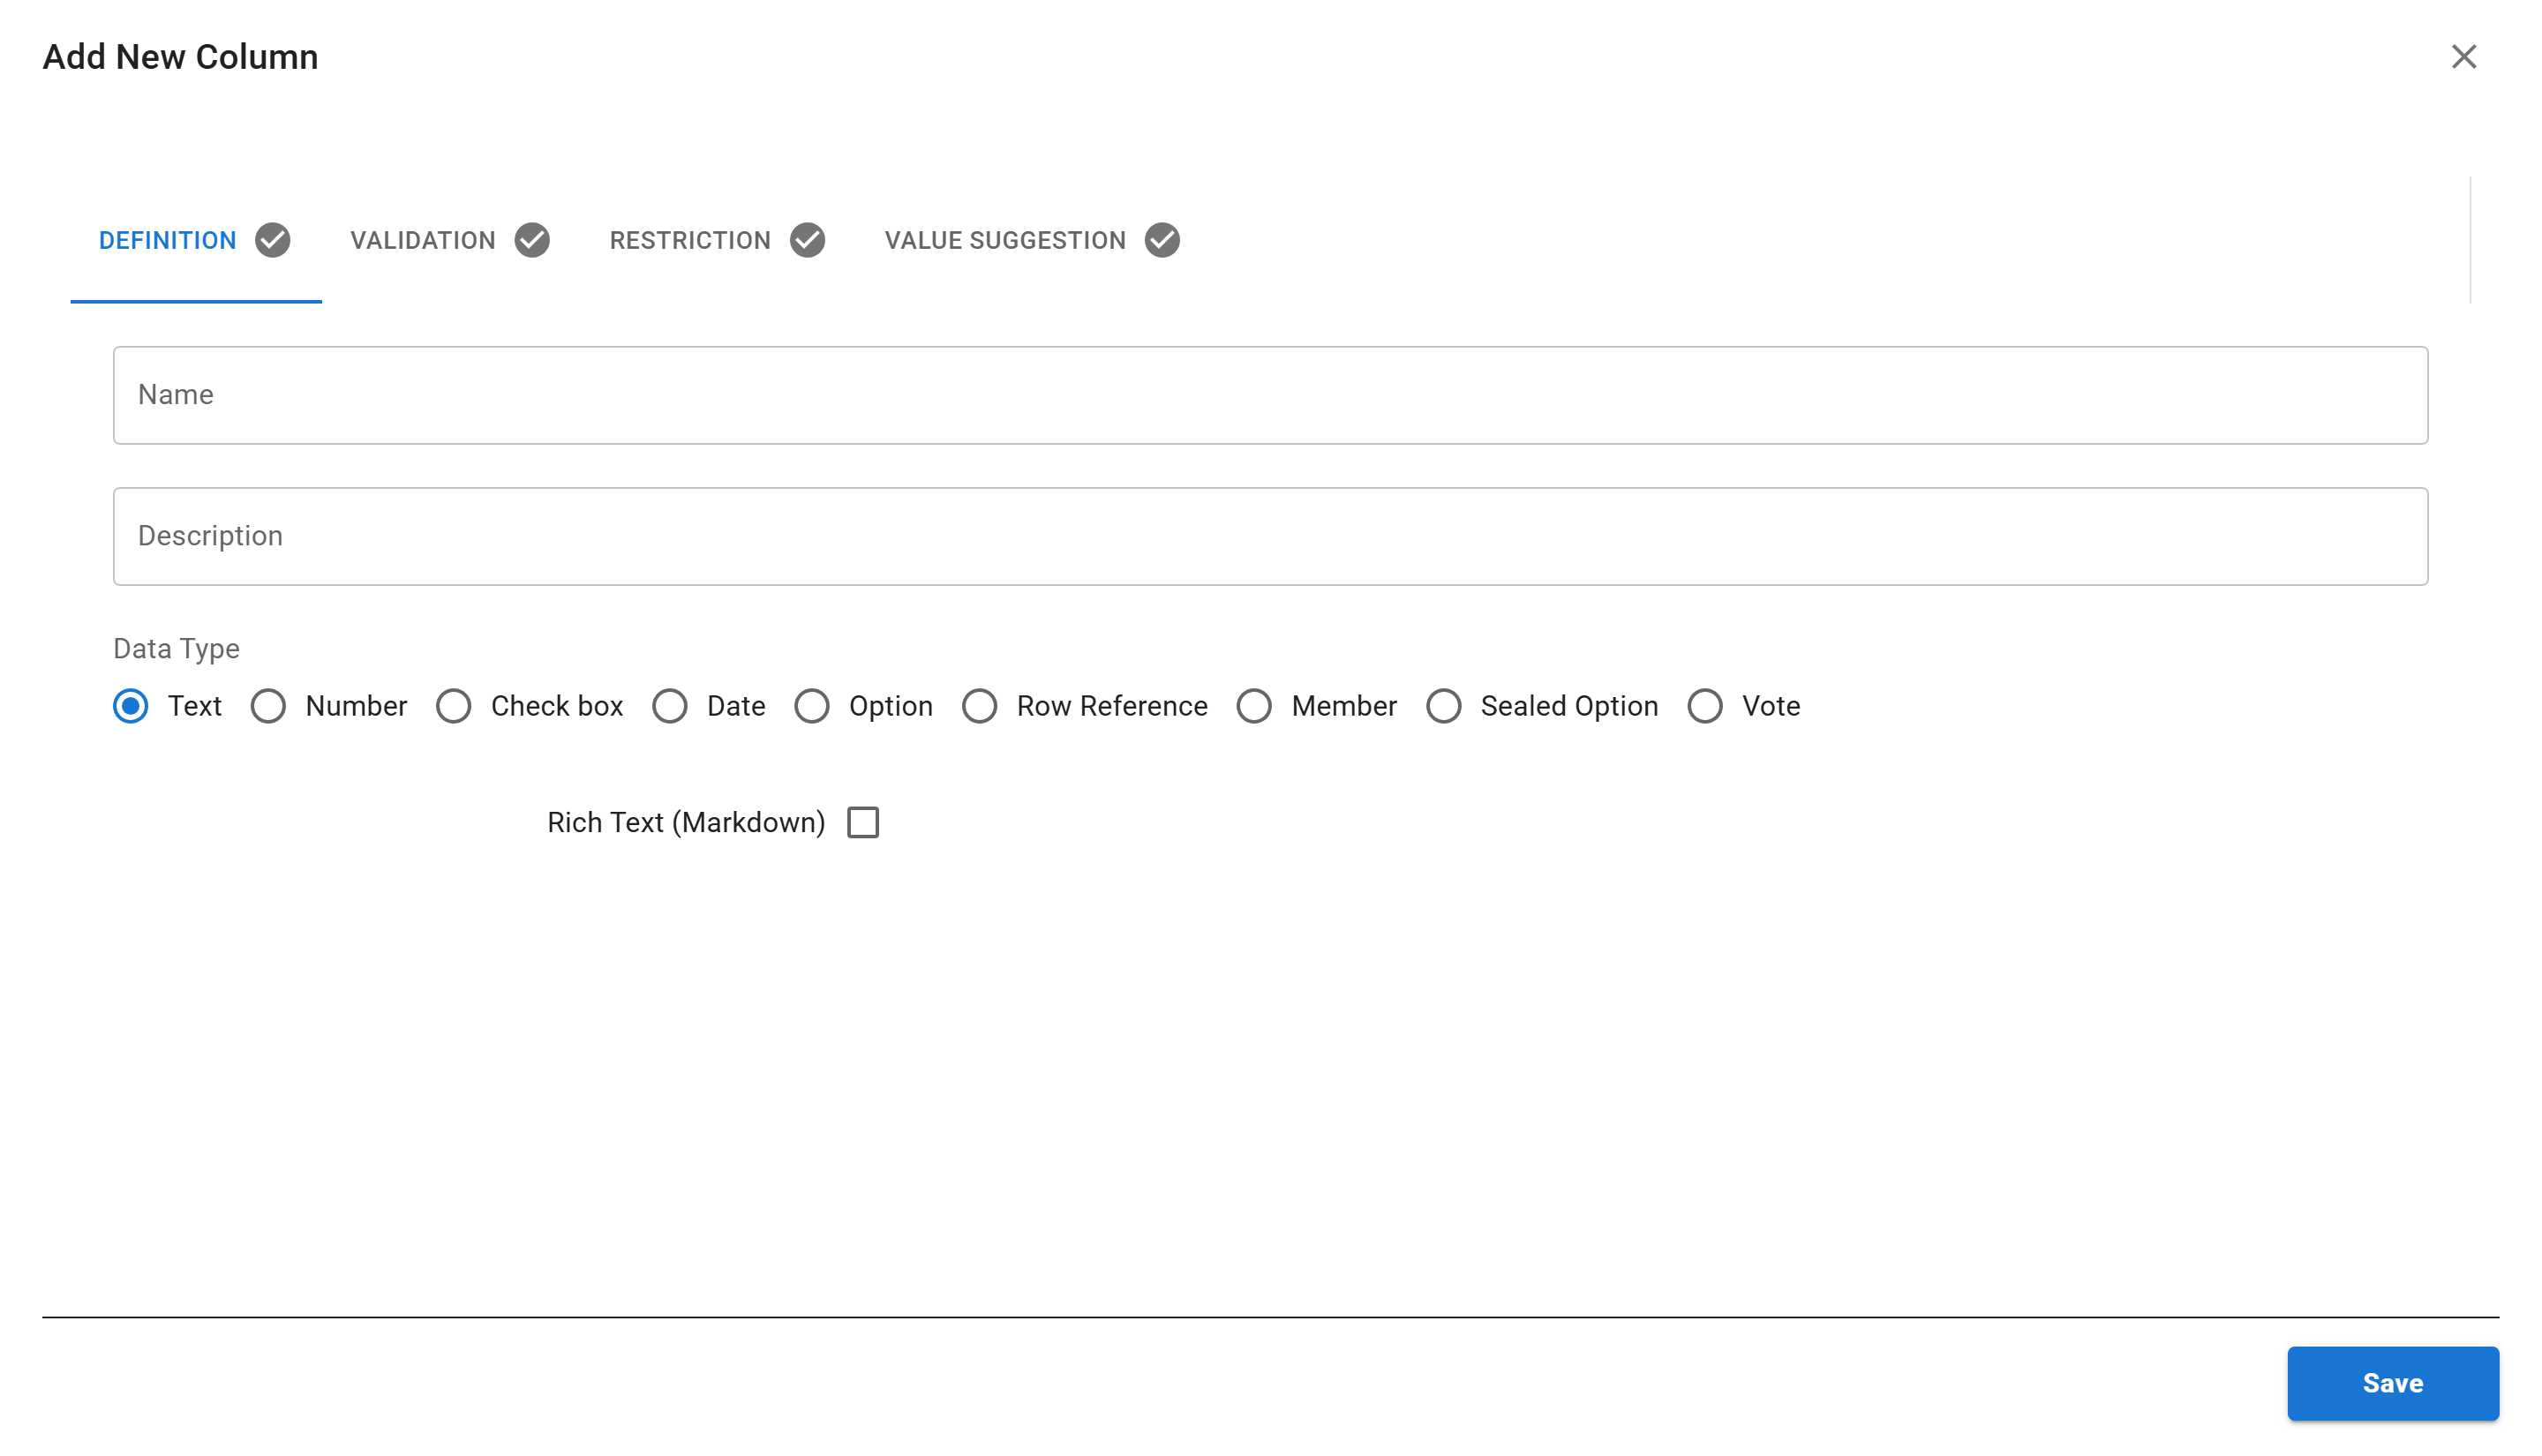
Fill in the column details on the Definition tab:
- Name:
Full Name - Description:
Employee's full name - Data Type: Select Text (already selected by default)
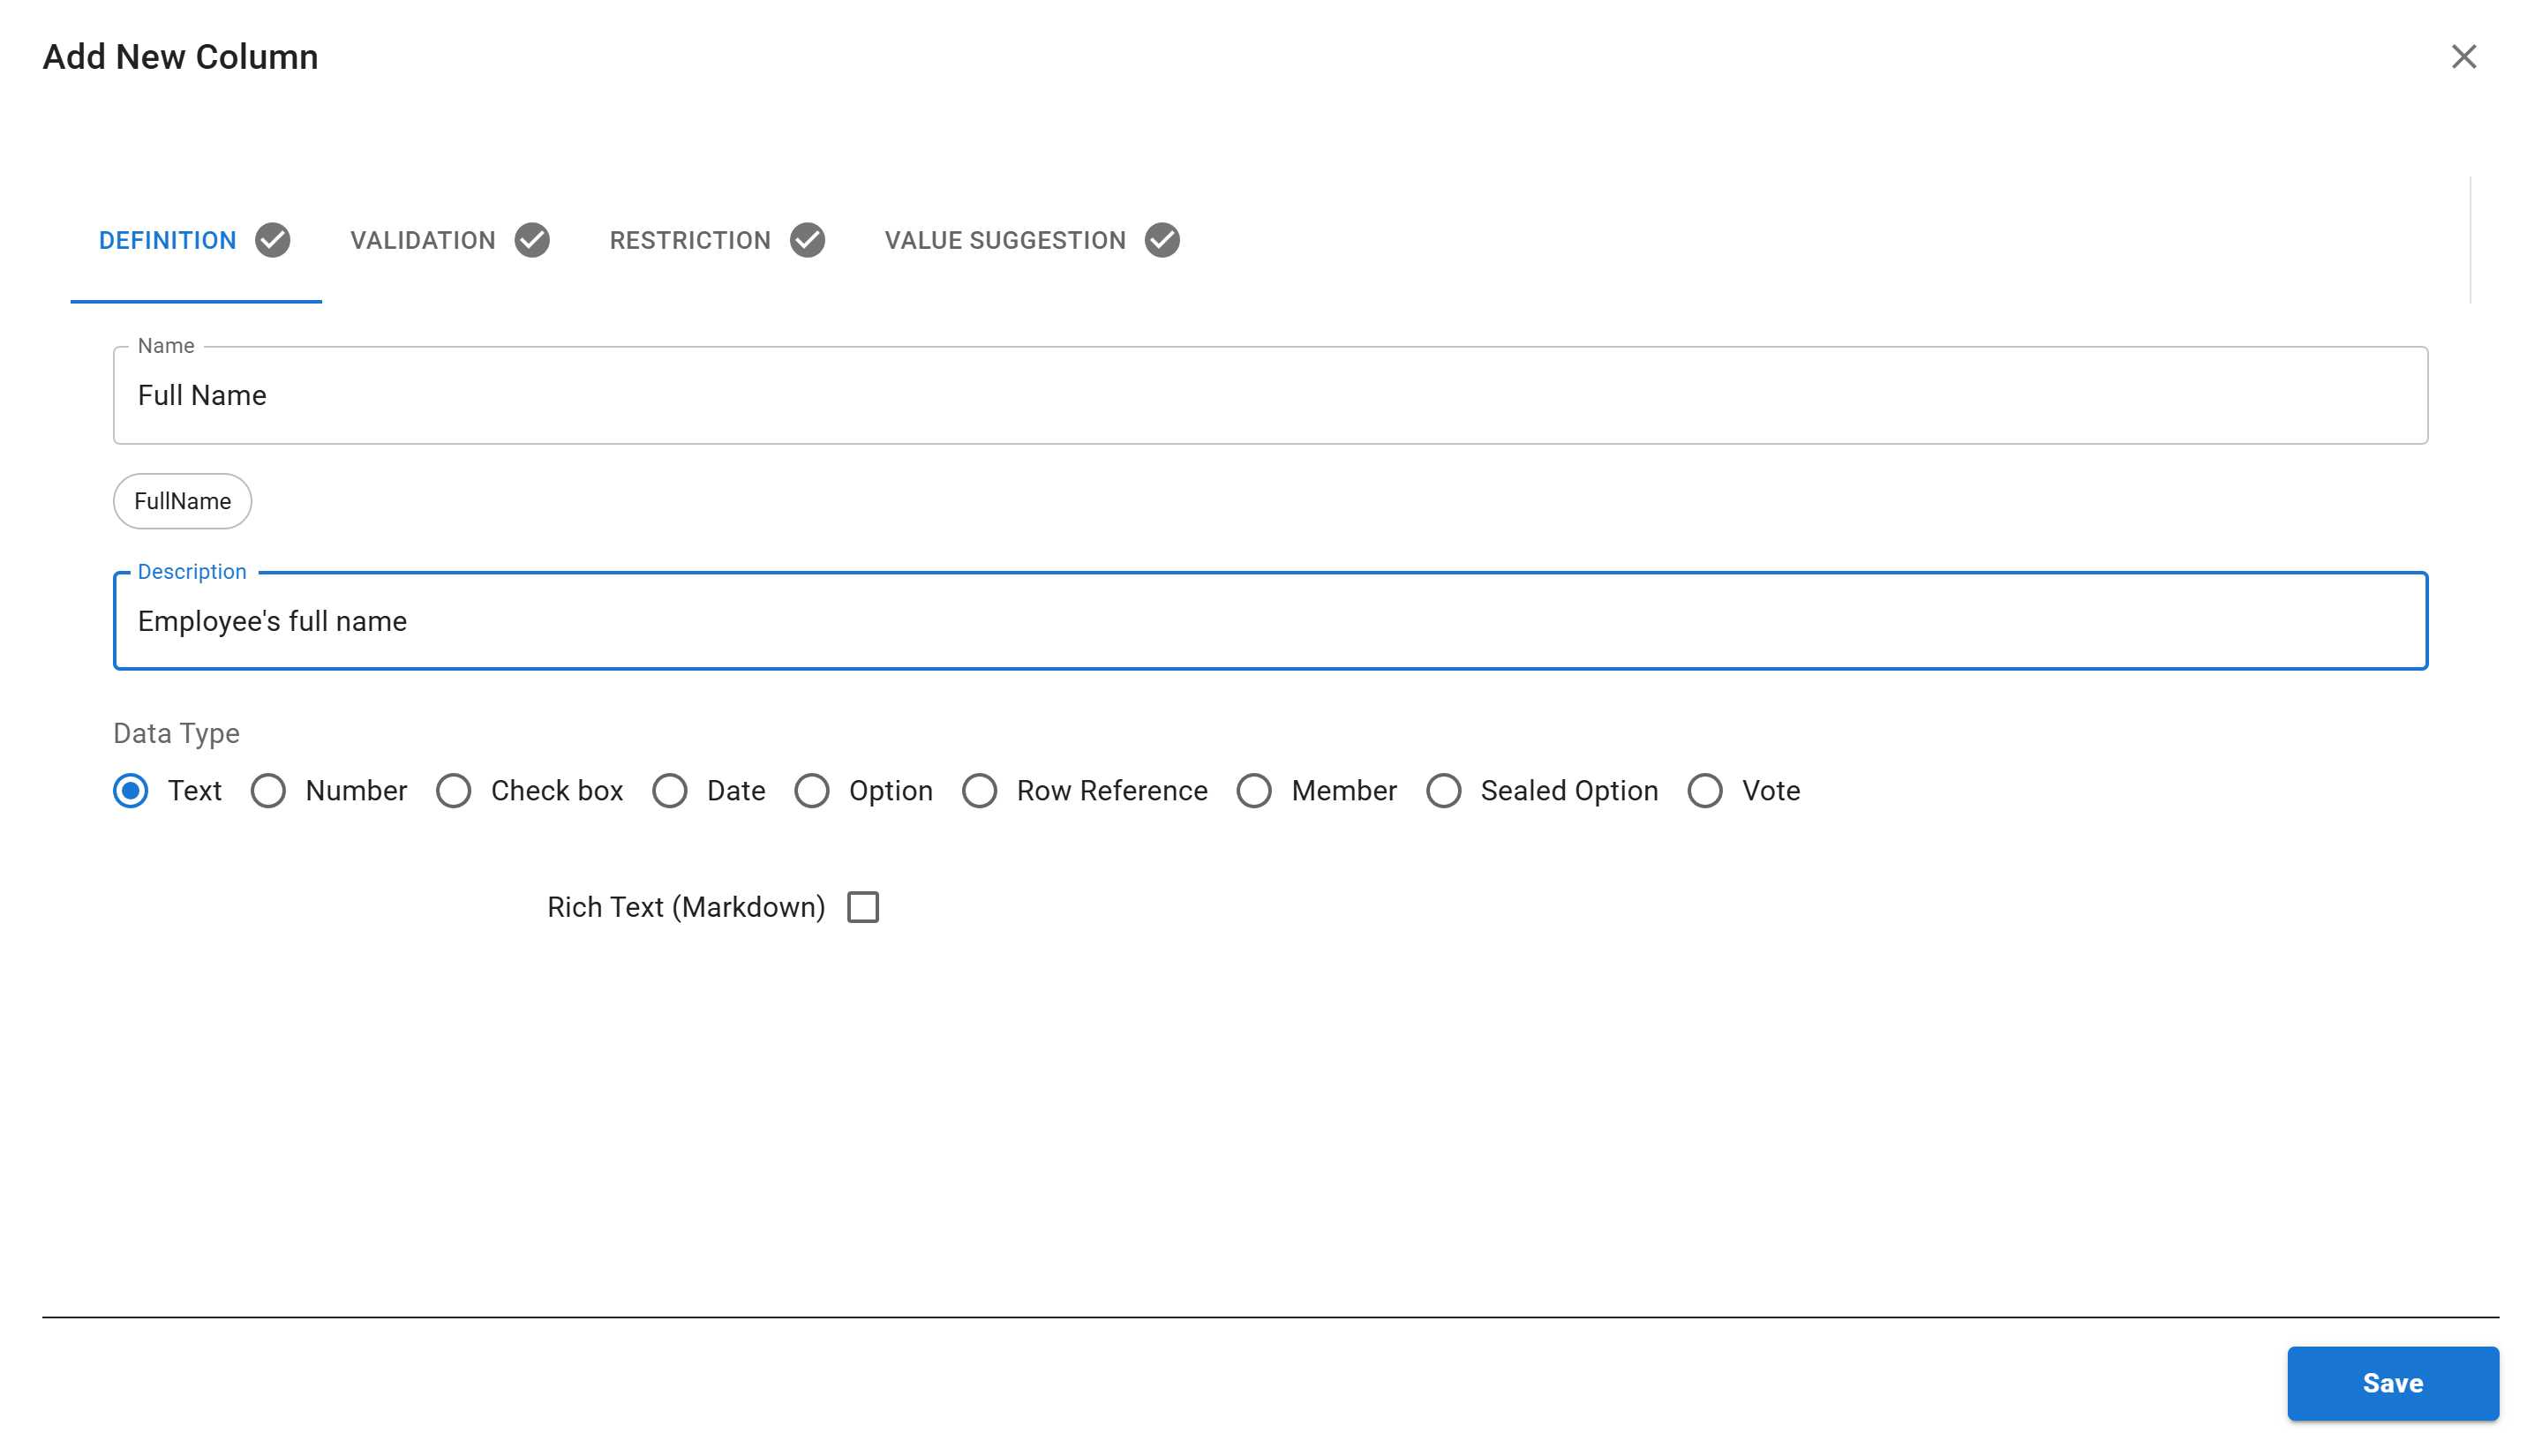
Click “SAVE” to create the column.
You’ll see a success message, and your new column will appear in your sheet!
Step 3: Adding More Columns
Section titled “Step 3: Adding More Columns”To add more columns, simply right-click on the data grid again and select “Add Column”. Let’s add a few more columns to demonstrate different data types.
Adding an Email Column (Text Type)
Section titled “Adding an Email Column (Text Type)”- Right-click on the data grid
- Select “Add Column”
- Enter:
- Name:
Email - Description:
Employee's email address - Data Type: Text
- Name:
- Click “SAVE”
Adding a Department Column (Option Type)
Section titled “Adding a Department Column (Option Type)”The Option data type creates a dropdown list of predefined choices - perfect for department selections!
- Right-click on the data grid
- Select “Add Column”
- Enter:
- Name:
Department - Description:
Employee's department - Data Type: Select Option
- Name:
-
When you select “Option”, additional fields appear:
- Allow Multi Selection - checkbox to allow selecting multiple options
- Options grid - where you define the available options
-
Click ”+ ADD OPTION” to add department options:
- Type
Engineeringin the first option - Click ”+ ADD OPTION” again to add more departments (like “Sales”, “Marketing”, “HR”)
- Type
-
Click “SAVE”
Understanding Data Types
Section titled “Understanding Data Types”Sheety App offers various data types to match your data needs:
| Data Type | Description | Example Use Case |
|---|---|---|
| Text | Plain text or rich text (markdown) | Names, descriptions, notes |
| Number | Numeric values (integers or decimals) | Age, salary, quantity |
| Check box | True/false or yes/no values | Active status, completed tasks |
| Date | Date and optionally time | Birth date, hire date, deadline |
| Option | Single or multiple choice from predefined list | Department, status, category |
| Row Reference | Link to another row in a different sheet | Manager reference, related items |
| Member | Reference to workspace members | Assigned to, created by |
| Sealed Option | Once a user selects an option, only they can change it | Personal assignments, claimed items |
| Vote | Allow users to vote on options | Survey responses, polls |
Viewing Your Columns in the Sheet
Section titled “Viewing Your Columns in the Sheet”After adding your columns, your sheet now displays them as column headers!
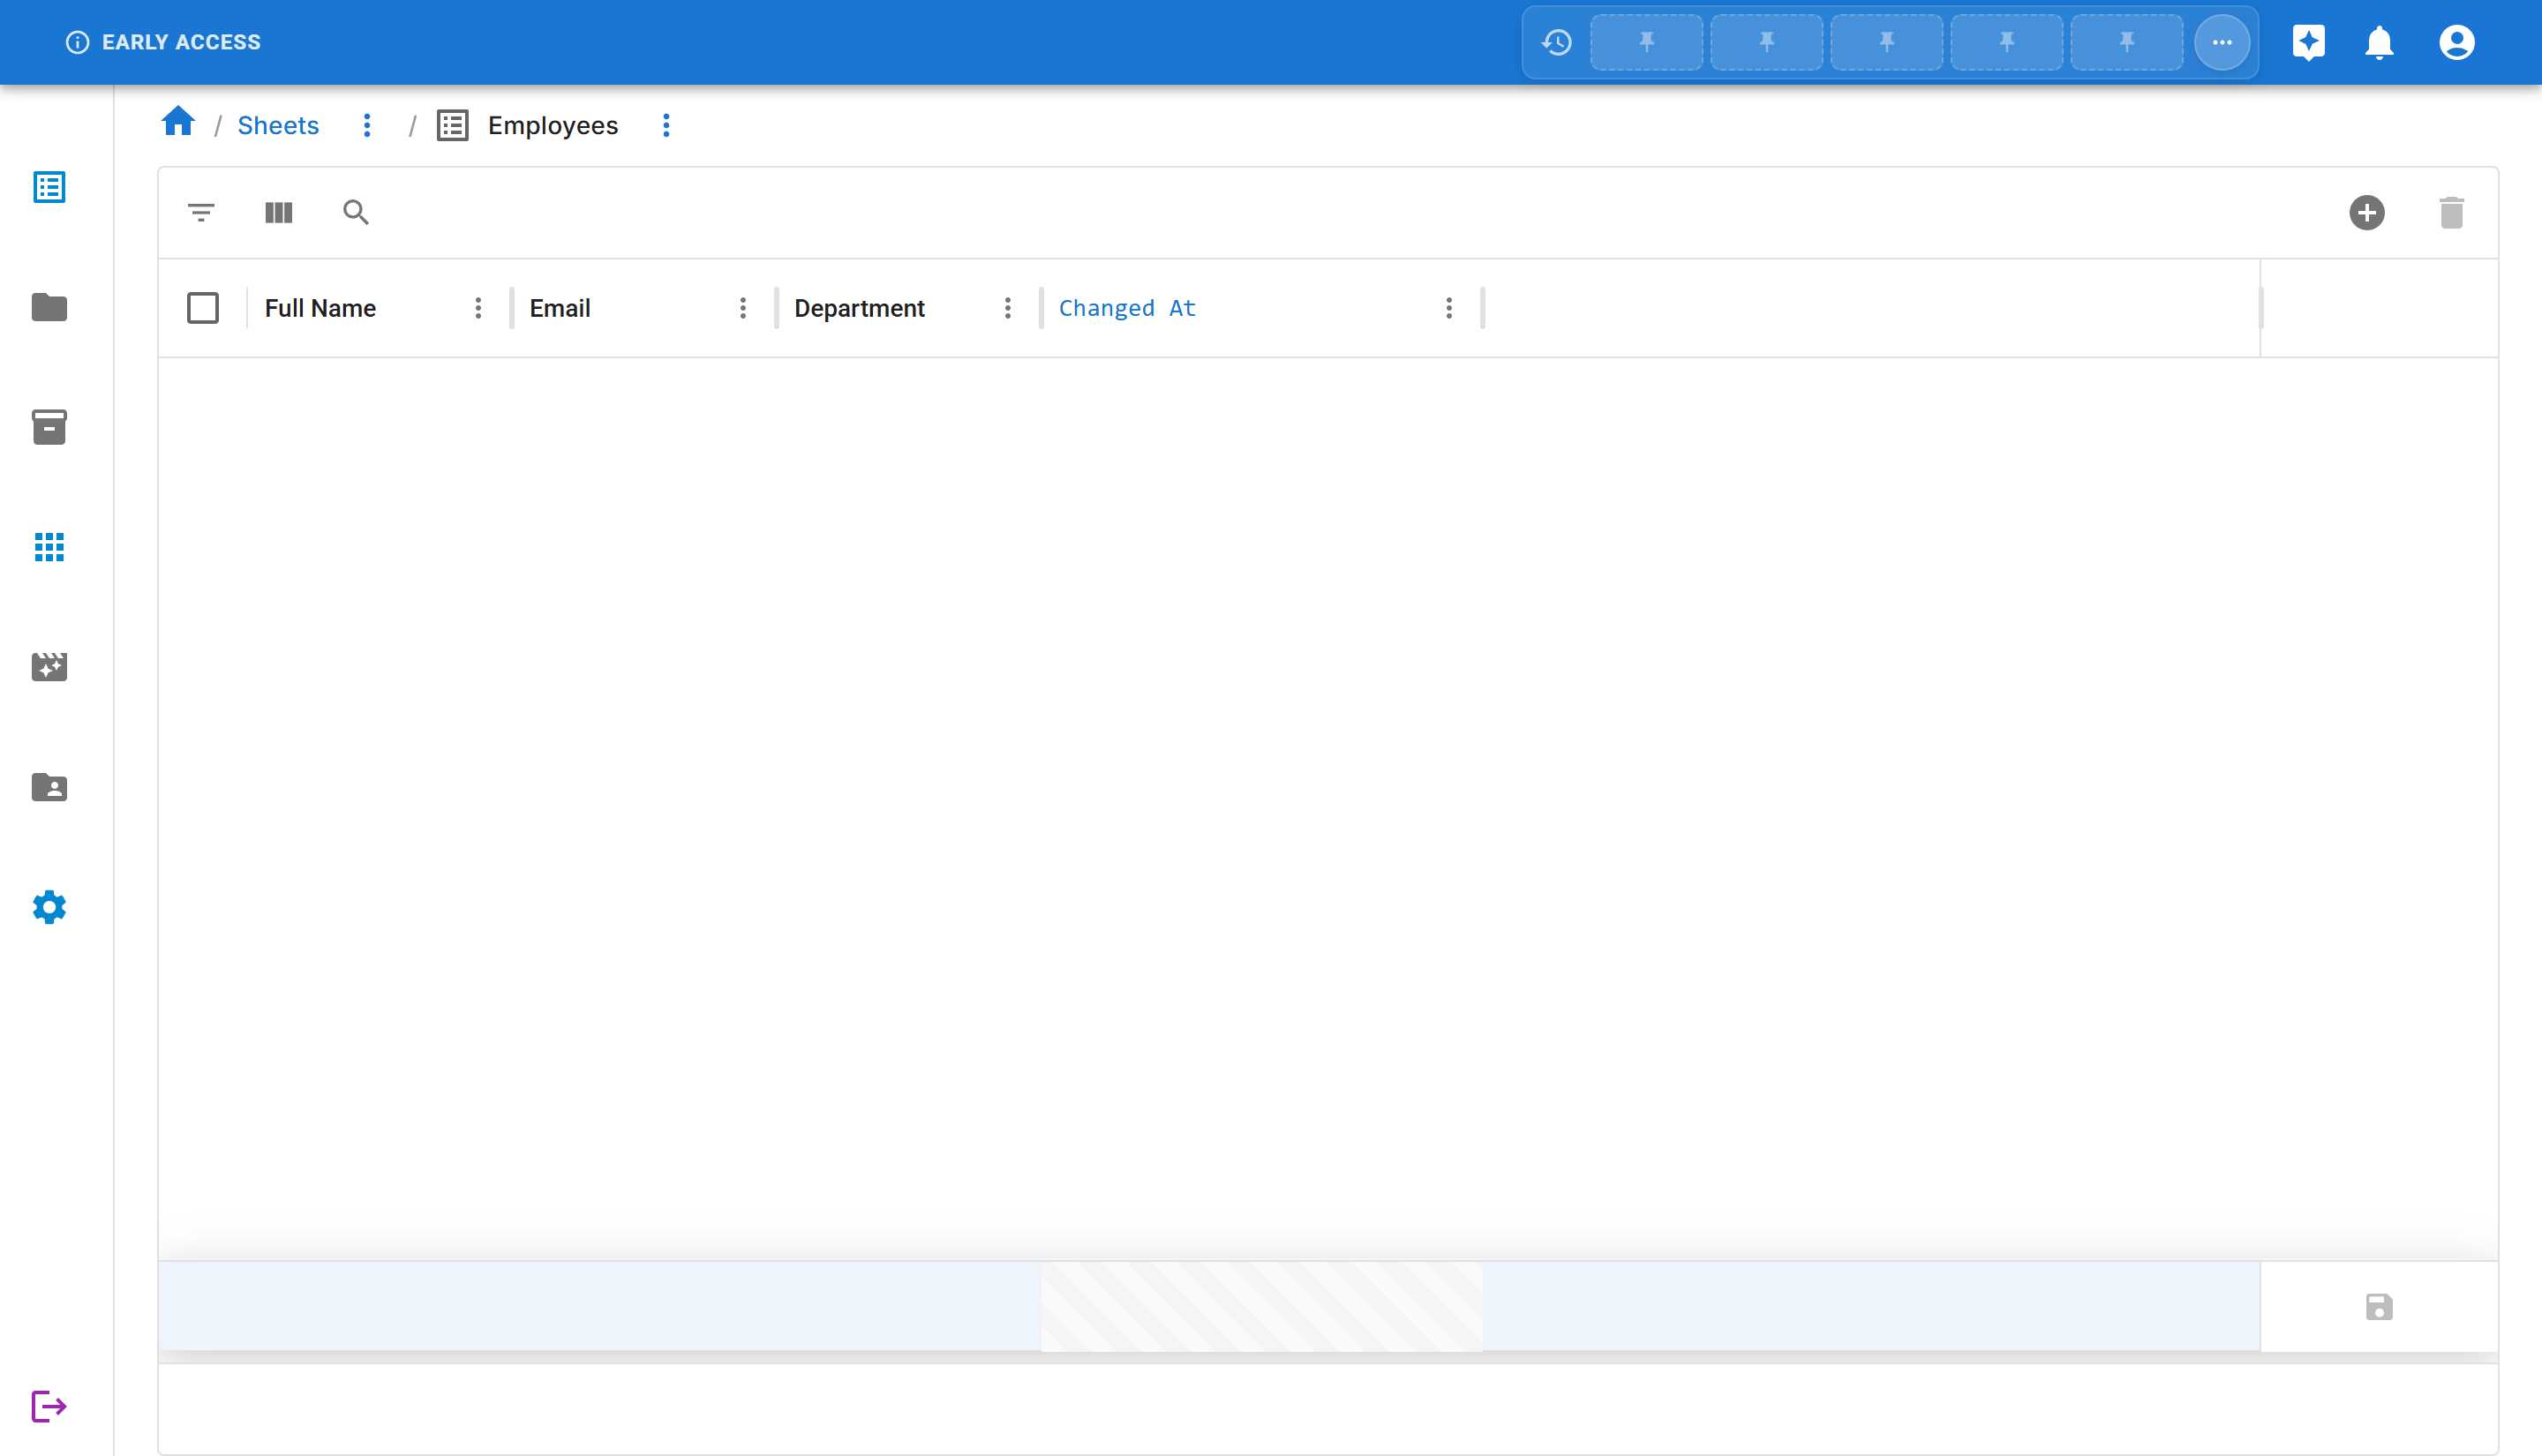
Your sheet now has:
- ✅ Full Name column (Text)
- ✅ Email column (Text)
- ✅ Department column (Option)
- ✅ Changed At (system column added automatically)
You’re now ready to start adding data to your sheet!
Editing Columns with Right-Click
Section titled “Editing Columns with Right-Click”Once you’ve created columns, you can quickly edit them by right-clicking on the column header. This is much faster than navigating to the Column Management Page when you just need to make a quick change.
How to Edit a Column
Section titled “How to Edit a Column”- Right-click on any column header in the data grid
- For example, right-click on the “Department” column header
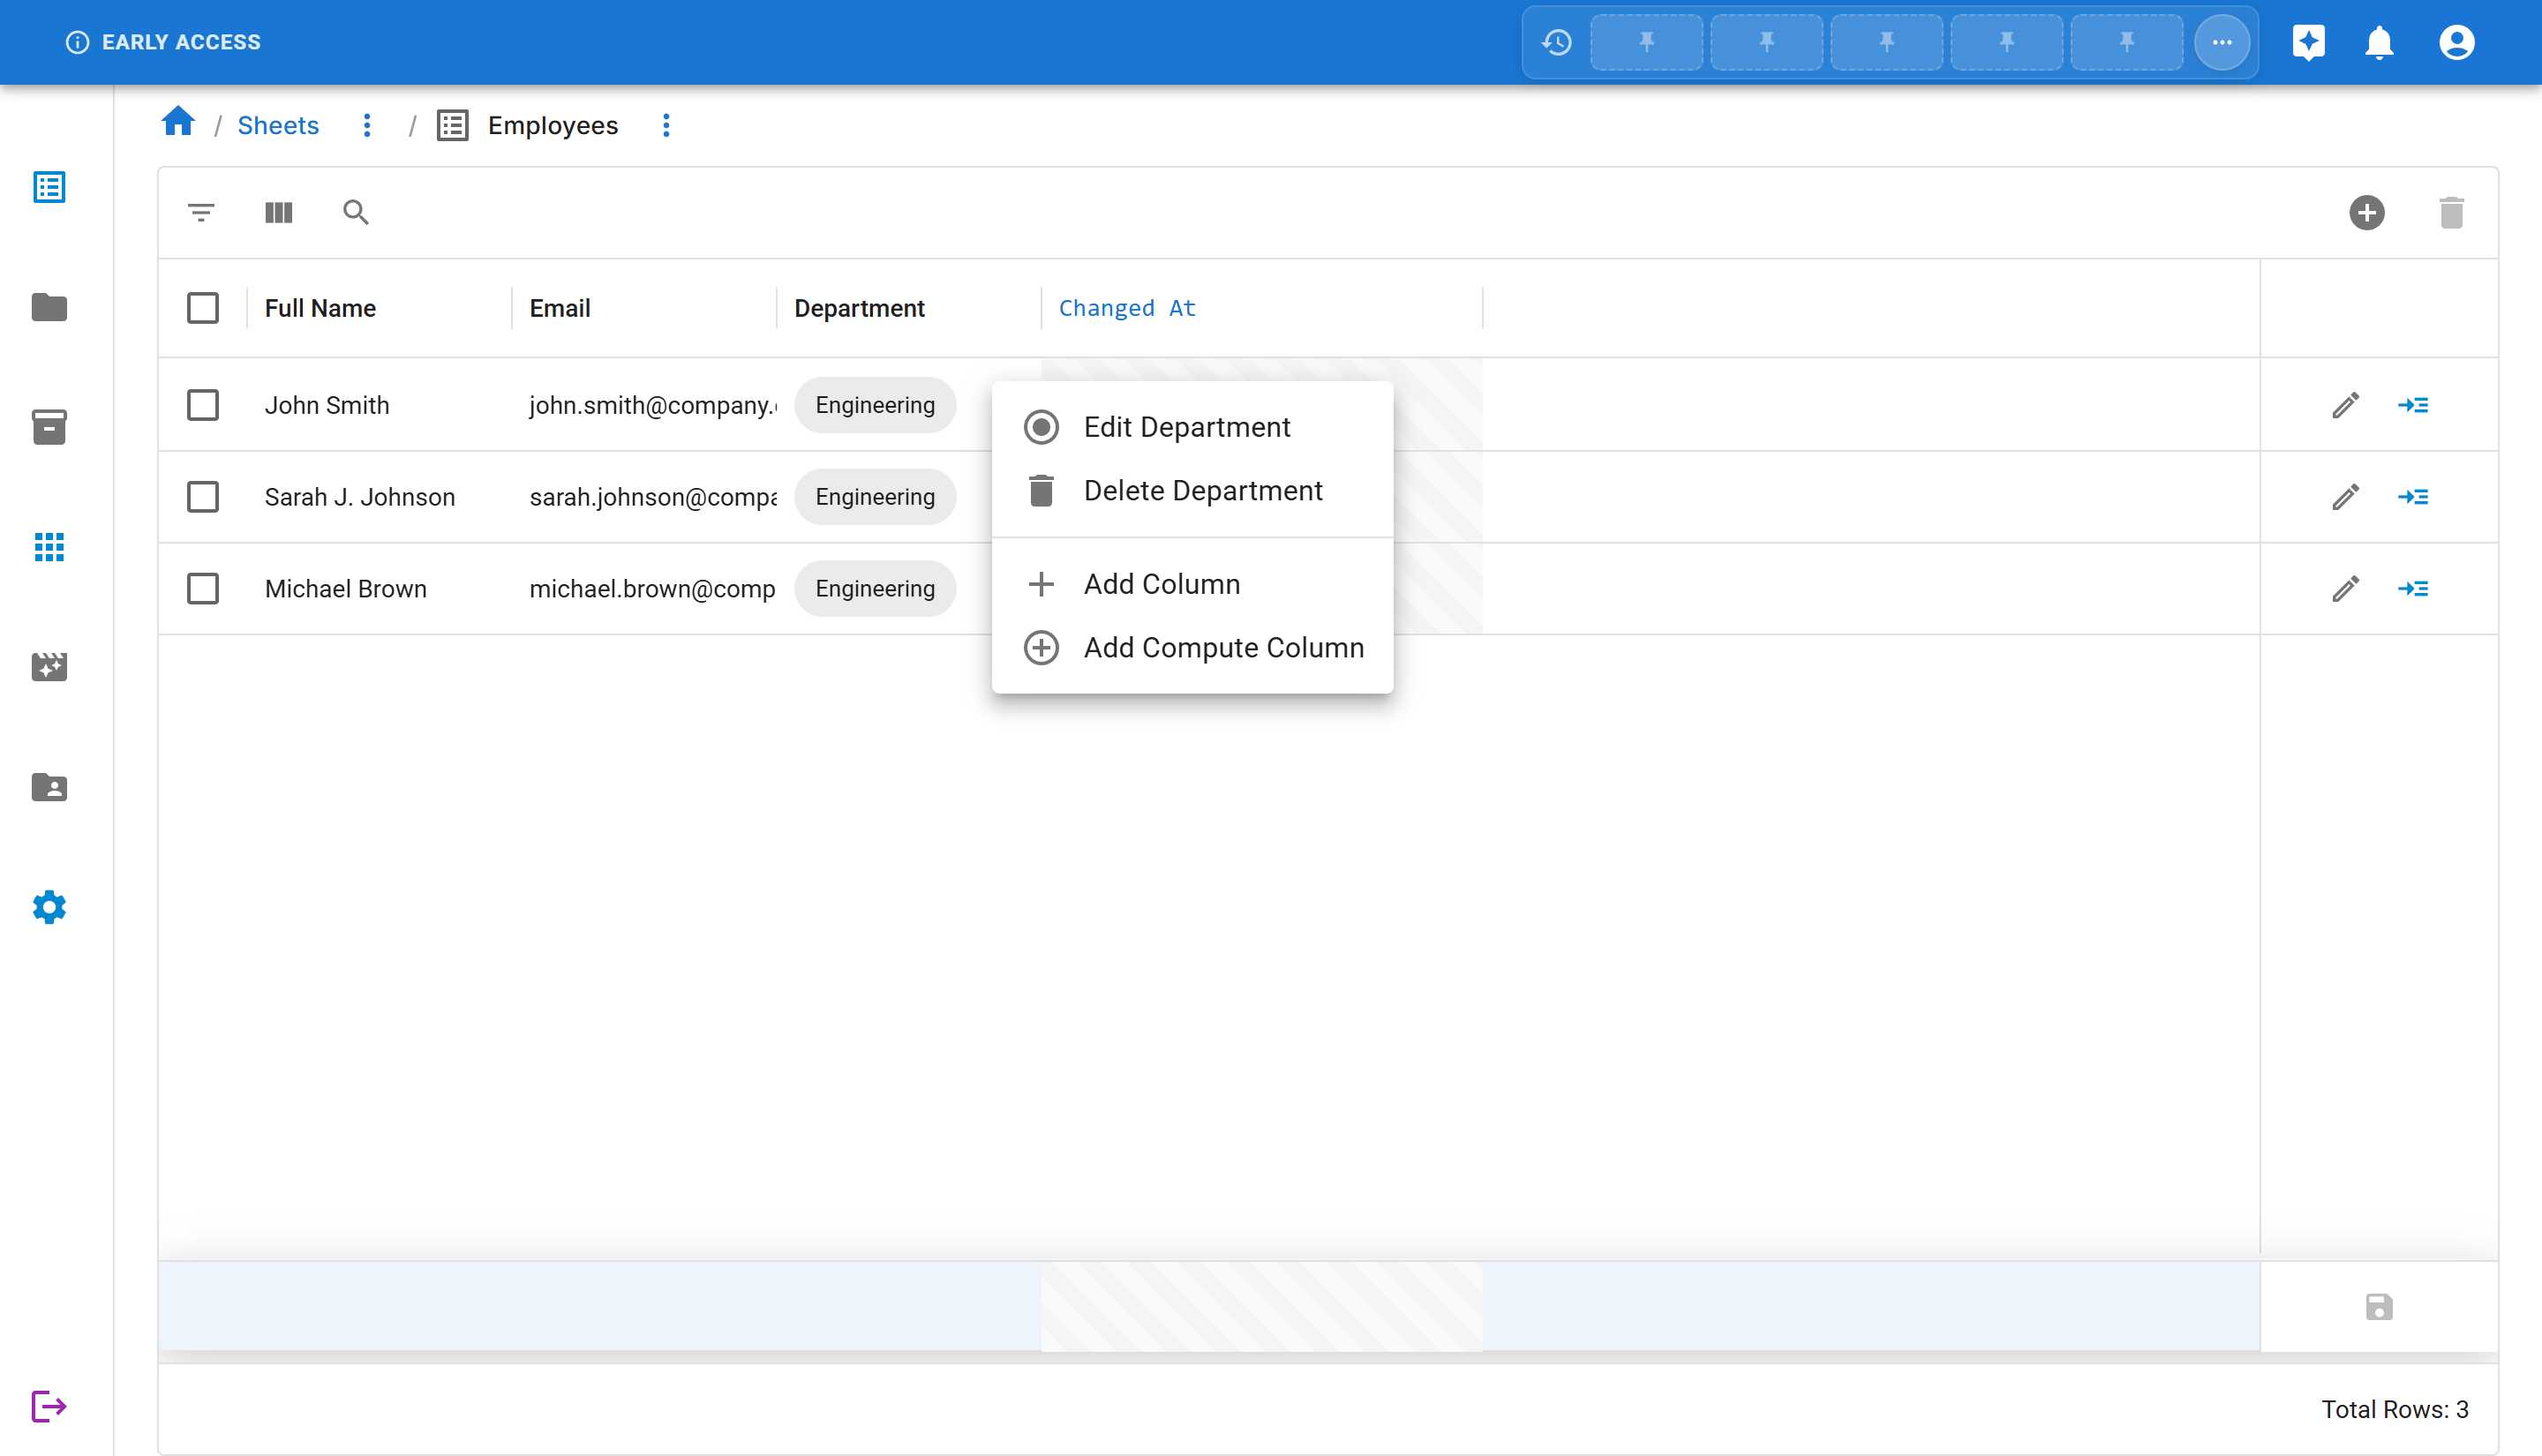
-
From the context menu, you’ll see options:
- Edit [Column Name] - Opens the Edit Column dialog
- Delete [Column Name] - Removes the column (with confirmation)
- Add Column - Adds a new column
- Add Compute Column - Adds a computed column
-
Select “Edit Department” (or whichever column you’re editing)
-
The “Edit Column” dialog opens with the same four tabs as when creating:
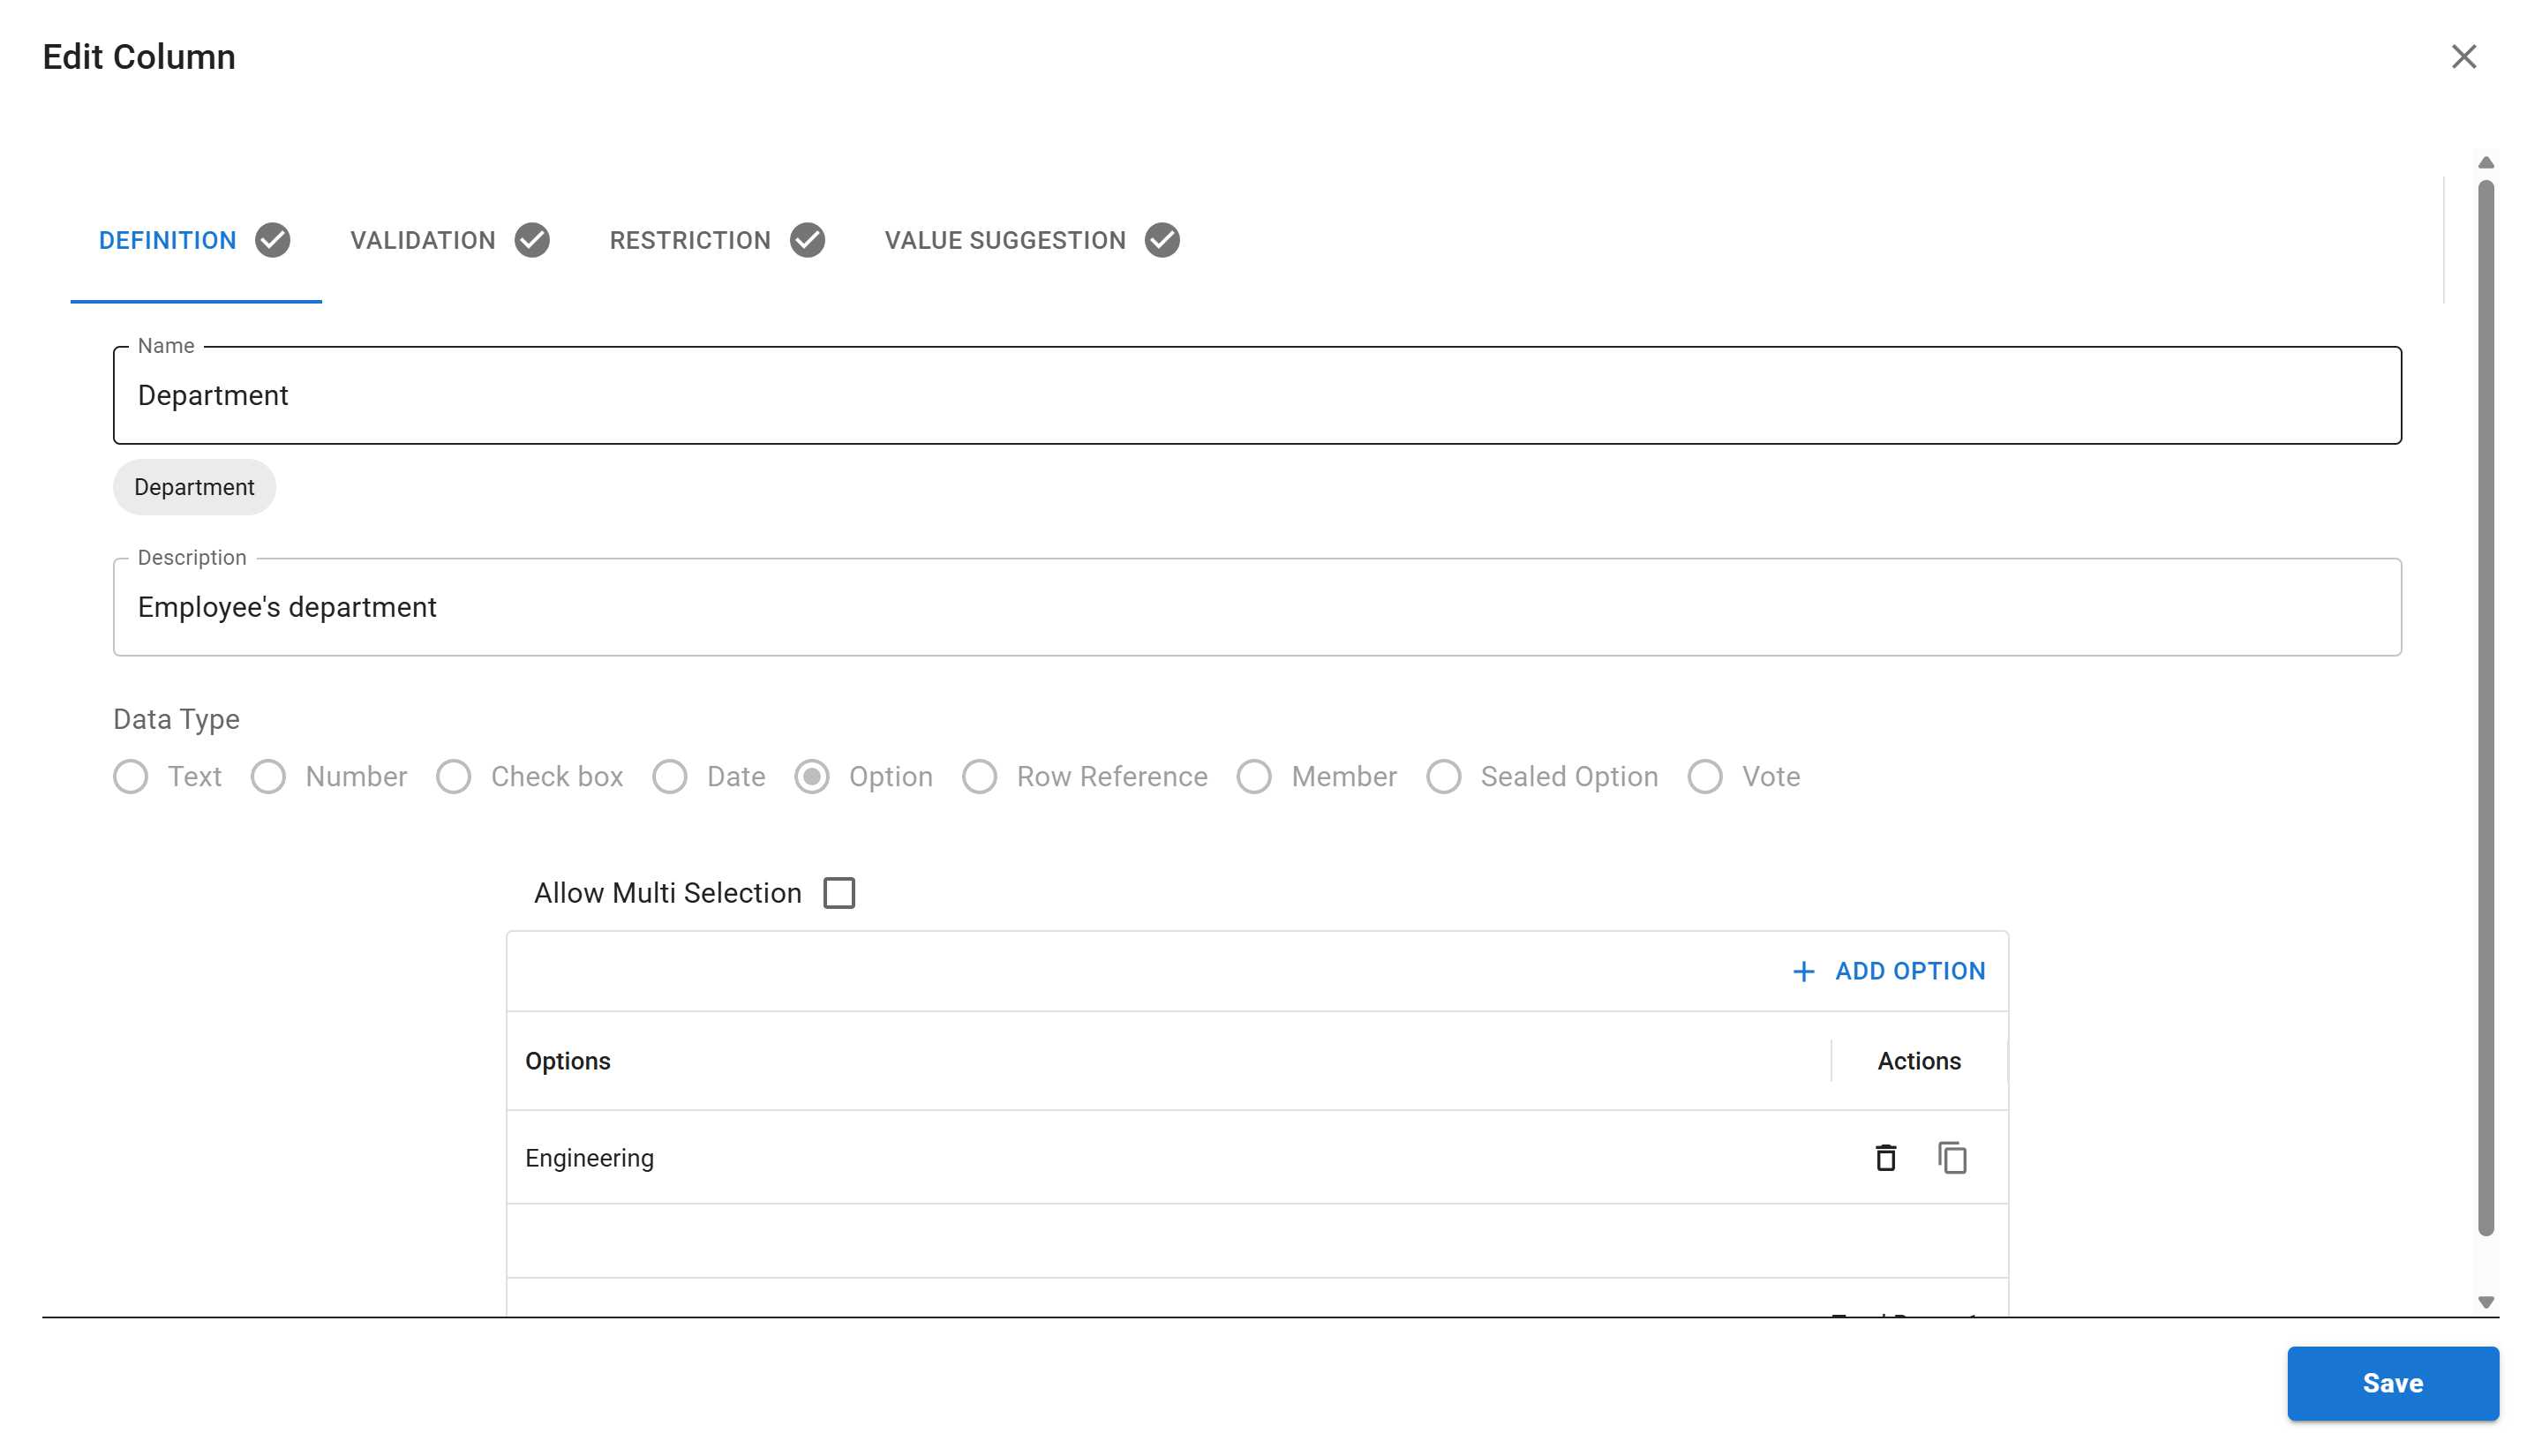
-
Make your changes:
- Update the Name or Description
- Modify settings on any of the tabs
- For Option columns, add or remove options from the list
- Note: The Data Type cannot be changed after creation (it’s disabled)
-
Click “SAVE” to apply your changes
Alternative: Using the Column Management Page
Section titled “Alternative: Using the Column Management Page”While right-clicking is the fastest way to add columns, you can also use the Column Management Page for more comprehensive column management. This is useful when you need to:
- View all columns at once
- Create multiple columns in succession
- Edit or delete existing columns
- Search for specific columns
- Organize your data structure
To access the Column Management Page:
- Click the three dots menu (⋯) next to the sheet name
- Select “Columns”
Learn more about the Column Management Page and its features in our Column Management guide.
Best Practices for Columns
Section titled “Best Practices for Columns”When creating columns, follow these best practices:
- Use descriptive names - Make column names clear and self-explanatory
- Add descriptions - Help team members understand what data goes in each column
- Choose the right data type - Select the most appropriate type for your data
- Start simple - Begin with essential columns and add more as needed
- Plan your structure - Think about relationships between data before creating columns
What’s Next?
Section titled “What’s Next?”Now that you know how to add columns, you can:
- Add Data to Your Sheet - Start entering information into your sheet
- Column Management Page - Learn about comprehensive column management features
Summary
Section titled “Summary”In this tutorial, you learned how to:
- ✅ Quickly add columns by right-clicking on the data grid
- ✅ Create columns with different data types (Text, Option)
- ✅ Understand the Add Column dialog and its tabs
- ✅ View your columns in the sheet
- ✅ Use the Column Management Page as an alternative
Your sheet now has a solid data structure and is ready for data entry!